
- Bioactive Compounds
- By Signaling Pathways
- PI3K/Akt/mTOR
- Epigenetics
- Methylation
- Immunology & Inflammation
- Protein Tyrosine Kinase
- Angiogenesis
- Apoptosis
- Autophagy
- ER stress & UPR
- JAK/STAT
- MAPK
- Cytoskeletal Signaling
- Cell Cycle
- TGF-beta/Smad
- DNA Damage/DNA Repair
- Compound Libraries
- Antibodies
- Bioreagents
- qPCR
- 2x SYBR Green qPCR Master Mix
- 2x SYBR Green qPCR Master Mix(Low ROX)
- 2x SYBR Green qPCR Master Mix(High ROX)
- Protein Assay
- Protein A/G Magnetic Beads for IP
- Anti-Flag magnetic beads
- Anti-Flag Affinity Gel
- Anti-Myc magnetic beads
- Anti-HA magnetic beads
- Magnetic Separator
- Poly DYKDDDDK Tag Peptide lyophilized powder
- Protease Inhibitor Cocktail
- Protease Inhibitor Cocktail (EDTA-Free, 100X in DMSO)
- Phosphatase Inhibitor Cocktail (2 Tubes, 100X)
- Cell Biology
- Cell Counting Kit-8 (CCK-8)
- Animal Experiment
- Mouse Direct PCR Kit (For Genotyping)
- New Products
- Contact Us
-
 Australia
-
 Austria
-
 Belgium
-
 Canada
-
 China
China
-
 Czech Republic
-
 Denmark
-
 Finland
-
 France
-
 Germany
-
 Greece
-
 Hong Kong
-
 Hungary
-
 Iceland
-
 India
India
-
 Ireland
-
 Israel
-
 Italy
Italy
-
 Japan
Japan
-
 Korea
Korea
-
 Luxembourg
-
 Malaysia
-
 Netherlands
-
 New Zealand
-
 Norway
-
 Poland
-
 Qatar
Qatar
-
 Romania
-
 Saudi Arabia
-
 Singapore
-
 Spain
Spain
-
 Sweden
-
 Switzerland
-
 Taiwan
-
 Turkey
-
 United Kingdom
-
 United States
-
 Other Countries
DGCR8 Rabbit mAb
Catalog No.: F2027
Application:
Reactivity:
-
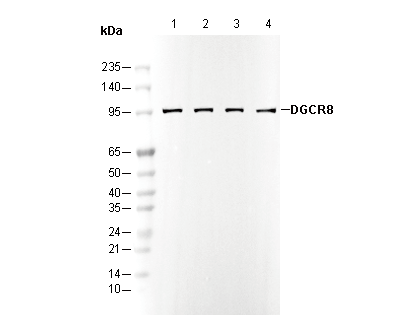 Lane 1: 293
Lane 2: Hela
Lane 3: Neuro-2a
Lane 4: 3T3
Usage Information
| Dilution |
|---|
|
| Application |
|---|
| WB, IP, IF, FCM |
| Source |
|---|
| Rabbit |
| Reactivity |
|---|
| Human, Mouse, Rat |
| Storage Buffer |
|---|
| PBS, pH 7.2+50% Glycerol+0.05% BSA+0.01% NaN₃ |
| Storage (from the date of receipt) |
|---|
| –20°C (avoid freeze-thaw cycles), 2 years |
| Predicted MW Observed MW |
|---|
| 86 kDa 90-100 kDa |
| *Why do the predicted and actual molecular weights differ? The following reasons may explain differences between the predicted and actual protein molecular weight. |
| Positive Control | " Mouse testis; Human fetal kidney; Mouse brain; Rat brain; Jurkat; HeLa; HEK-293; WEHI-3; Neuro-2a; PC-12; NIH/3T3; A549; PC-3" |
|---|---|
| Negative Control |
Exprimental Methods
| WB |
|---|
Experimental Protocol:
Sample preparation
1. Tissue: Lyse the tissue sample by adding an appropriate volume of ice-cold RIPA/Nuclear Lysis Buffer (containing Protease Inhibitor Cocktail),and homogenize the tissue at a low temperature or lyse it by sonication on ice, then incubate on ice for 30 minutes. 2. Adherent cell: Aspirate the culture medium and transfer the cells into an EP tube. Wash the cells with ice-cold PBS twice. Add an appropriate volume of RIPA/Nuclear Lysis Buffer (containing Protease Inhibitor Cocktail), sonicate to lyse the cells, and incubate on ice for 30 minutes. 3. Suspension cell: Transfer the culture medium to a pre-cooled centrifuge tube. Centrifuge and aspirate the supernatant. Wash the cells with ice-cold PBS twice.Add an appropriate volume of RIPA/Nuclear Lysis Buffer (containing Protease Inhibitor Cocktail), sonicate to lyse the cells, and incubate on ice for 30 minutes. 4. Place the lysate into a pre-cooled microcentrifuge tube. Centrifuge at 4°C for 15 min. Collect the supernatant;
5. Remove a small volume of lysate to determine the protein concentration;
6. Combine the lysate with protein loading buffer. Boil 20 µL sample under 95-100°C for 5 min. Centrifuge for 5 min after cool down on ice.
Electrophoretic separation
1. According to the concentration of extracted protein, load appropriate amount of protein sample and marker onto SDS-PAGE gels for electrophoresis. Recommended separating gel (lower gel) concentration: 10%. Reference Table for Selecting SDS-PAGE Separation Gel Concentrations 2. Power up 80V for 30 minutes. Then the power supply is adjusted (110 V~150 V), the Marker is observed, and the electrophoresis can be stopped when the indicator band of the predyed protein Marker where the protein is located is properly separated. (Note that the current should not be too large when electrophoresis, too large current (more than 150 mA) will cause the temperature to rise, affecting the result of running glue. If high currents cannot be avoided, an ice bath can be used to cool the bath.)
Transfer membrane
1. Take out the converter, soak the clip and consumables in the pre-cooled converter;
2. Activate PVDF membrane with methanol for 1 min and rinse with transfer buffer;
3. Install it in the order of "black edge of clip - sponge - filter paper - filter paper - glue -PVDF membrane - filter paper - filter paper - sponge - white edge of clip"; 4. The protein was electrotransferred to PVDF membrane. ( 0.45 µm PVDF membrane is recommended ) Reference Table for Selecting PVDF Membrane Pore Size Specifications Recommended conditions for wet transfer: 200 mA, 120 min. ( Note that the transfer conditions can be adjusted according to the protein size. For high-molecular-weight proteins, a higher current and longer transfer time are recommended. However, ensure that the transfer tank remains at a low temperature to prevent gel melting.)
Block
1. After electrotransfer, wash the film with TBST at room temperature for 5 minutes;
2. Incubate the film in the blocking solution for 1 hour at room temperature;
3. Wash the film with TBST for 3 times, 5 minutes each time.
Antibody incubation
1. Use 5% skim milk powder to prepare the primary antibody working liquid (recommended dilution ratio for primary antibody 1:1000), gently shake and incubate with the film at 4°C overnight; 2. Wash the film with TBST 3 times, 5 minutes each time;
3. Add the secondary antibody to the blocking solution and incubate with the film gently at room temperature for 1 hour;
4. After incubation, wash the film with TBST 3 times for 5 minutes each time.
Antibody staining
819. Add the prepared ECL luminescent substrate (or select other color developing substrate according to the second antibody) and mix evenly;
2. Incubate with the film for 1 minute, remove excess substrate (keep the film moist), wrap with plastic film, and expose in the imaging system. |
| IF |
|---|
Experimental Protocol:
Sample Preparation
1. Adherent Cells: Place a clean, sterile coverslip in a culture dish. Once the cells grow to near confluence as a monolayer, remove the coverslip for further use.
2. Suspension Cells: Seed the cells onto a clean, sterile slide coated with poly-L-lysine.
3. Frozen Sections: Allow the slide to thaw at room temperature. Wash it with pure water or PBS for 2 times, 3 minutes each time.
4. Paraffin Sections: Deparaffinization and rehydration. Wash the slide with pure water or PBS for 3 times, 3 minutes each time. Then perform antigen retrieval.
Fixation
1. Fix the cell coverslips/spots or tissue sections at room temperature using a fixative such as 4% paraformaldehyde (4% PFA) for 10-15 minutes.
2. Wash the sample with PBS for 3 times, 3 minutes each time.
Permeabilization
1.Add a detergent such as 0.1–0.3% Triton X-100 to the sample and incubate at room temperature for 10–20 minutes.
(Note: This step is only required for intracellular antigens. For antigens expressed on the cell membrane, this step is unnecessary.)
Wash the sample with PBS for 3 times, 3 minutes each time.
Blocking
Add blocking solution and incubate at room temperature for at least 1 hour. (Common blocking solutions include: serum from the same source as the secondary antibody, BSA, or goat serum.)
Note: Ensure the sample remains moist during and after the blocking step to prevent drying, which can lead to high background.
Immunofluorescence Staining (Day 1)
1. Remove the blocking solution and add the diluted primary antibody.
2. Incubate the sample in a humidified chamber at 4°C overnight.
Immunofluorescence Staining (Day 2)
1. Remove the primary antibody and wash with PBST for 3 times, 5 minutes each time.
2. Add the diluted fluorescent secondary antibody and incubate in the dark at 4°C for 1–2 hours.
3. Remove the secondary antibody and wash with PBST for 3 times, 5 minutes each time.
4. Add diluted DAPI and incubate at room temperature in the dark for 5–10 minutes.
5. Wash with PBST for 3 times, 5 minutes each time.
Mounting
1. Mount the sample with an anti-fade mounting medium.
2. Allow the slide to dry at room temperature overnight in the dark.
3. Store the slide in a slide storage box at 4°C, protected from light.
|
Biological Description
| Specificity |
|---|
DGCR8 Rabbit mAb recognizes endogenous levels of total DGCR8 protein. |
| Uniprot ID |
|---|
| Q8WYQ5 |
| Clone |
|---|
| H18F12 |
| Background |
|---|
DGCR8 (DiGeorge syndrome critical region 8) is an RNA-binding protein essential for miRNA biogenesis and gene regulation. It forms a microprocessor complex with Drosha in the nucleus to convert primary miRNAs (pri-miRNAs) into precursor miRNAs (pre-miRNAs). DGCR8 contains a WW domain and two double-stranded RNA-binding domains (dsRBDs) that specifically recognize RNA substrates. Its activity is regulated through multiple mechanisms: UV-induced phosphorylation on Serine 153 enhances DNA repair and cellular resistance to UV damage; MeCP2 binding to dsRBDs prevents Drosha from binding; a heme group promotes DGCR8 dimerization, facilitating miRNA processing; and deacetylation increases processing efficiency. Furthermore, DGCR8 is phosphorylated at 23 sites, potentially involving ERK/MAPK and other kinases, which enhances its stability. Besides miRNA processing, DGCR8 regulates the stability of some mRNAs and snoRNAs, highlighting its versatile role in RNA metabolism and its importance in maintaining gene regulation and cellular integrity. |
| References |
|---|
Tech Support
Answers to questions you may have can be found in the inhibitor handling instructions. Topics include how to prepare stock solutions, how to store inhibitors, and issues that need special attention for cell-based assays and animal experiments.
Tel: +1-832-582-8158 Ext:3
If you have any other enquiries, please leave a message.
* Indicates a Required Field
Products are for research use only. Not for human use. We do not sell to patients.
©Copyright 2013 Selleck Chemicals. All Rights Reserved.