
-
 Australia
-
 Austria
-
 Belgium
-
 Brazil
-
 Canada
-
 China
China
-
 Czech Republic
-
 Denmark
-
 Finland
-
 France
-
 Germany
-
 Greece
-
 Hong Kong
-
 Hungary
-
 Iceland
-
 India
India
-
 Ireland
-
 Israel
-
 Italy
Italy
-
 Japan
Japan
-
 Korea
Korea
-
 Luxembourg
-
 Malaysia
-
 Netherlands
-
 New Zealand
-
 Norway
-
 Poland
-
 Qatar
Qatar
-
 Romania
-
 Saudi Arabia
-
 Singapore
-
 Spain
Spain
-
 Sweden
-
 Switzerland
-
 Taiwan
-
 Turkey
-
 United Kingdom
-
 United States
research use only
XPB Antibody (Rabbit mAb) [D23K21]
CatNo: F9488
Application:
Reactivity:
-
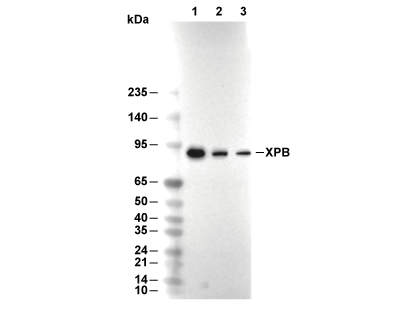 Lane 1: Hela, Lane 2: 293T, Lane 3: Jrukat
Experiment Essentials
WB
Recommended WB dilution ratio: 1:10000
Recommended WB dilution ratio: 1:10000
Usage Information
| Dilution |
|---|
|
| Application |
|---|
| WB, IF |
| Reactivity |
|---|
| Human |
| Source |
|---|
| Rabbit Monoclonal Antibody |
| Storage Buffer |
|---|
| PBS, pH 7.2+50% Glycerol+0.05% BSA+0.01% NaN3 |
| Storage (from the date of receipt) |
|---|
| -20°C (avoid freeze-thaw cycles), 2 years |
| Predicted MW |
|---|
| 89 kDa |
| Positive Control | HeLa cells; A549 cells; 293 cells; Jurkat cells |
|---|---|
| Negative Control |
Experimental Methods
| WB |
|---|
Experimental Protocol:
Sample preparation
1. Tissue: Lyse the tissue sample by adding an appropriate volume of ice-cold RIPA/Nuclear Lysis Buffer (containing Protease Inhibitor Cocktail),and homogenize the tissue at a low temperature or lyse it by sonication on ice, then incubate on ice for 30 minutes. 2. Adherent cell: Aspirate the culture medium and wash the cells with ice-cold PBS twice. Lyse the cells by adding an appropriate volume of RIPA/Nuclear Lysis Buffer (containing Protease Inhibitor Cocktail) , sonicate to lyse the cells, and incubate on ice for 30 minutes. 3. Suspension cell: Transfer the culture medium to a pre-cooled centrifuge tube. Centrifuge and aspirate the supernatant. Wash the cells with ice-cold PBS twice. Lyse the cells by adding an appropriate volume of RIPA/Nuclear Lysis Buffer (containing Protease Inhibitor Cocktail) , sonicate to lyse the cells, and incubate on ice for 30 minutes. 4. Place the lysate into a pre-cooled microcentrifuge tube. Centrifuge at 4°C for 15 min. Collect the supernatant;
5. Remove a small volume of lysate to determine the protein concentration;
6. Combine the lysate with protein loading buffer. Boil 20 µL sample under 95-100°C for 5 min. Centrifuge for 5 min after cool down on ice.
Electrophoretic separation
1. According to the concentration of extracted protein, load appropriate amount of protein sample and marker onto SDS-PAGE gels for electrophoresis. Recommended separating gel (lower gel) concentration: 10%. Reference Table for Selecting SDS-PAGE Separation Gel Concentrations 2. Power up 80V for 30 minutes. Then the power supply is adjusted (110 V~150 V), the Marker is observed, and the electrophoresis can be stopped when the indicator band of the predyed protein Marker where the protein is located is properly separated. (Note that the current should not be too large when electrophoresis, too large current (more than 150 mA) will cause the temperature to rise, affecting the result of running glue. If high currents cannot be avoided, an ice bath can be used to cool the bath.)
Transfer membrane
1. Take out the converter, soak the clip and consumables in the pre-cooled converter;
2. Activate PVDF membrane with methanol for 1 min and rinse with transfer buffer;
3. Install it in the order of "black edge of clip - sponge - filter paper - filter paper - glue -PVDF membrane - filter paper - filter paper - sponge - white edge of clip"; 4. The protein was electrotransferred to PVDF membrane. ( 0.45 µm PVDF membrane is recommended ) Reference Table for Selecting PVDF Membrane Pore Size Specifications Recommended conditions for wet transfer: 200 mA, 120 min. ( Note that the transfer conditions can be adjusted according to the protein size. For high-molecular-weight proteins, a higher current and longer transfer time are recommended. However, ensure that the transfer tank remains at a low temperature to prevent gel melting.)
Block
1. After electrotransfer, wash the film with TBST at room temperature for 5 minutes;
2. Incubate the film in the blocking solution for 1 hour at room temperature;
3. Wash the film with TBST for 3 times, 5 minutes each time.
Antibody incubation
1. Use primary antibody dilution buffer to prepare the primary antibody working liquid (recommended dilution ratio for primary antibody 1:10000), gently shake and incubate with the film at 4°C overnight; 2. Wash the film with TBST 3 times, 5 minutes each time;
3. Add the secondary antibody to the blocking solution and incubate with the film gently at room temperature for 1 hour;
4. After incubation, wash the film with TBST 3 times for 5 minutes each time.
Antibody staining
1. Add the prepared ECL luminescent substrate (or select other color developing substrate according to the second antibody) and mix evenly;
2. Incubate with the film for 1 minute, remove excess substrate (keep the film moist), wrap with plastic film, and expose in the imaging system. |
| IF |
|---|
Experimental Protocol:
Sample Preparation
1. Adherent Cells: Place a clean, sterile coverslip in a culture dish. Once the cells grow to near confluence as a monolayer, remove the coverslip for further use.
2. Suspension Cells: Seed the cells onto a clean, sterile slide coated with poly-L-lysine.
3. Frozen Sections: Allow the slide to thaw at room temperature. Wash it with pure water or PBS for 2 times, 3 minutes each time.
4. Paraffin Sections: Deparaffinization and rehydration. Wash the slide with pure water or PBS for 3 times, 3 minutes each time. Then perform antigen retrieval.
Fixation
1. Fix the cell coverslips/spots or tissue sections at room temperature using a fixative such as 4% paraformaldehyde (4% PFA) for 10-15 minutes.
2. Wash the sample with PBS for 3 times, 3 minutes each time.
Permeabilization
1.Add a detergent such as 0.1–0.3% Triton X-100 to the sample and incubate at room temperature for 10–20 minutes.
(Note: This step is only required for intracellular antigens. For antigens expressed on the cell membrane, this step is unnecessary.)
Wash the sample with PBS for 3 times, 3 minutes each time.
Blocking
Add blocking solution and incubate at room temperature for at least 1 hour. (Common blocking solutions include: serum from the same source as the secondary antibody, BSA, or goat serum.)
Note: Ensure the sample remains moist during and after the blocking step to prevent drying, which can lead to high background.
Immunofluorescence Staining (Day 1)
1. Remove the blocking solution and add the diluted primary antibody.
2. Incubate the sample in a humidified chamber at 4°C overnight.
Immunofluorescence Staining (Day 2)
1. Remove the primary antibody and wash with PBST for 3 times, 5 minutes each time.
2. Add the diluted fluorescent secondary antibody and incubate in the dark at 4°C for 1–2 hours.
3. Remove the secondary antibody and wash with PBST for 3 times, 5 minutes each time.
4. Add diluted DAPI and incubate at room temperature in the dark for 5–10 minutes.
5. Wash with PBST for 3 times, 5 minutes each time.
Mounting
1. Mount the sample with an anti-fade mounting medium.
2. Allow the slide to dry at room temperature overnight in the dark.
3. Store the slide in a slide storage box at 4°C, protected from light.
|
Biological Description
| Specificity |
|---|
| XPB Antibody (Rabbit mAb) [D23K21] detects endogenous levels of total XPB protein. |
| Subcellular Location |
|---|
| Nucleus |
| Uniprot ID |
|---|
| P19447 |
| Clone |
|---|
| D23K21 |
| Synonym(s) |
|---|
| XPB | XPBC | ERCC3 | General transcription and DNA repair factor IIH helicase/translocase subunit XPB | TFIIH subunit XPB | Basic transcription factor 2 89 kDa subunit | DNA 3'-5' helicase/translocase XPB | DNA excision repair protein ERCC-3 | DNA repair protein complementing XP-B cells | TFIIH basal transcription factor complex 89 kDa subunit | Xeroderma pigmentosum group B-complementing protein | BTF2 p89 | TFIIH 89 kDa subunit | TFIIH p89 |
| Background |
|---|
| XPB (ERCC3) is an ATP-dependent DNA helicase of the SF2 family that functions as an essential catalytic subunit of the ten-protein transcription factor IIH (TFIIH) complex, where it couples ATP hydrolysis to DNA translocation and local duplex opening during both transcription initiation and nucleotide excision repair (NER). The protein contains two RecA-like helicase domains flanked by accessory elements including a conserved Thumb and a damage-recognition region, and structural analyses of archaeal and human XPB demonstrate a “rotation and push” mechanism in which ATP-driven conformational changes reorient these domains from an open to a closed state to generate short DNA bubbles with defined 3′–5′ polarity around target sites. Within TFIIH at promoters, XPB acts as a 3′–5′ translocase on downstream double-stranded DNA, exerting torque that opens the transcription bubble and allows RNA polymerase II to initiate synthesis, while simultaneously anchoring the CAK kinase module (CDK7–cyclin H–MAT1) to TFIIH and thus integrating promoter opening with phosphorylation of the polymerase C‑terminal domain and cell-cycle signaling. During NER, XPB works with the 5′–3′ helicase XPD to define and extend the repair bubble around bulky lesions such as UV-induced pyrimidine dimers or cisplatin adducts; XPB’s limited helicase activity opens a small, precisely positioned region of the duplex, which is then further unwound and verified by XPD before dual incisions by XPG and ERCC1–XPF excise the damaged strand. In archaeal systems, XPB forms a helicase–nuclease machine with the structure-specific endonuclease Bax1: XPB extends DNA bubbles and Bax1 cleaves kinked DNA at positions equivalent to eukaryotic XPG cuts, and XPB’s Thumb and damage-recognition domains are crucial for this concerted bubble-extension and incision activity, providing a structural framework for understanding eukaryotic XPB’s coordination with NER nucleases. In human cells, post-translational regulation of XPB modulates TFIIH repair capacity, as phosphorylation of serine 751 by casein kinase II enhances TFIIH’s NER activity, while dephosphorylation or XPB inhibition reduces repair efficiency, demonstrating that XPB ATPase/translocase function is tuned by signaling pathways that respond to DNA damage. Mutations in XPB that impair helicase activity, TFIIH assembly or recruitment cause xeroderma pigmentosum group B and combined XP–Cockayne syndrome or trichothiodystrophy phenotypes, characterized by extreme UV hypersensitivity, defective global-genome and transcription-coupled NER, and in some cases neurological deficits, reflecting XPB’s central role as a genome caretaker at the crossroads of transcription, repair and apoptosis. |
| References |
|---|
|
Tech Support
Tel: +1-832-582-8158 Ext:3
If you have any other enquiries, please leave a message.

Products are for research use only. Not for human use. We do not sell to patients.
©Copyright 2013 Selleck Chemicals. All Rights Reserved.