
-
 Argentina
-
 Australia
-
 Austria
-
 Belgium
-
 Brazil
-
 Canada
-
 China
China
-
 Czech Republic
-
 Denmark
-
 Finland
-
 France
-
 Germany
-
 Greece
-
 Hong Kong
-
 Hungary
-
 Iceland
-
 India
India
-
 Ireland
-
 Israel
-
 Italy
Italy
-
 Japan
Japan
-
 Korea
Korea
-
 Luxembourg
-
 Malaysia
-
 Netherlands
-
 New Zealand
-
 Norway
-
 Poland
-
 Portugal
-
 Qatar
Qatar
-
 Romania
-
 Saudi Arabia
-
 Singapore
-
 Spain
Spain
-
 Sweden
-
 Switzerland
-
 Taiwan
-
 Turkey
-
 United Kingdom
-
 United States
research use only
PSMC2 Antibody (Mouse mAb) [A15H16]
CatNo: F9368
Application:
Reactivity:
-
 Lane 1: Hela, Lane 2: MCF7, Lane 3: HepG2, Lane 4: Daudi
 -
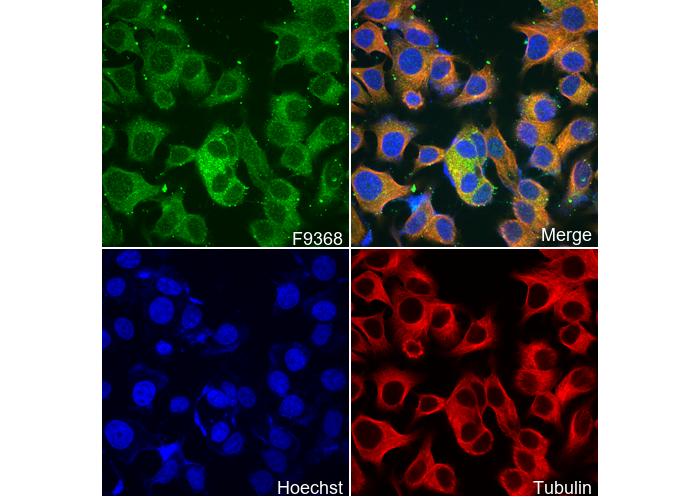 Immunofluorescent analysis of MCF-7 cells using F9368 (green, 1:50), Hoechst (blue) and tubulin (Red).
Experiment Essentials
WB
Recommended WB dilution ratio: 1:100
Exposure time of at least 90s is recommended.
Recommended WB dilution ratio: 1:100
Exposure time of at least 90s is recommended.
Usage Information
| Dilution |
|---|
|
| Application |
|---|
| WB, IP, IF, ELISA |
| Reactivity |
|---|
| Human, Mouse, Rat |
| Source |
|---|
| Mouse Monoclonal Antibody |
| Storage Buffer |
|---|
| PBS, pH 7.2+50% Glycerol+0.05% BSA+0.01% NaN3 |
| Storage (from the date of receipt) |
|---|
| -20°C (avoid freeze-thaw cycles), 2 years |
| Predicted MW |
|---|
| 49 kDa |
| Positive Control | HeLa cells; MCF7 cells; HepG2 cells; Daudi cells; K‑562 cells; EOC 20 cells; C6 cells; PC‑12 cells; Sol8 cells |
|---|---|
| Negative Control |
Experimental Methods
| WB |
|---|
Experimental Protocol:
Sample preparation
1. Tissue: Lyse the tissue sample by adding an appropriate volume of ice-cold RIPA/NP-40 Lysis Buffer (containing Protease Inhibitor Cocktail),and homogenize the tissue at a low temperature or lyse it by sonication on ice, then incubate on ice for 30 minutes. 2. Adherent cell: Aspirate the culture medium and wash the cells with ice-cold PBS twice. Lyse the cells by adding an appropriate volume of RIPA/NP-40 Lysis Buffer (containing Protease Inhibitor Cocktail) , sonicate to lyse the cells, and incubate on ice for 30 minutes. 3. Suspension cell: Transfer the culture medium to a pre-cooled centrifuge tube. Centrifuge and aspirate the supernatant. Wash the cells with ice-cold PBS twice. Lyse the cells by adding an appropriate volume of RIPA/NP-40 Lysis Buffer (containing Protease Inhibitor Cocktail) , sonicate to lyse the cells, and incubate on ice for 30 minutes. 4. Place the lysate into a pre-cooled microcentrifuge tube. Centrifuge at 4°C for 15 min. Collect the supernatant;
5. Remove a small volume of lysate to determine the protein concentration;
6. Combine the lysate with protein loading buffer. Boil 20 µL sample under 95-100°C for 5 min. Centrifuge for 5 min after cool down on ice.
Electrophoretic separation
1. According to the concentration of extracted protein, load appropriate amount of protein sample and marker onto SDS-PAGE gels for electrophoresis. Recommended separating gel (lower gel) concentration: 10%. Reference Table for Selecting SDS-PAGE Separation Gel Concentrations 2. Power up 80V for 30 minutes. Then the power supply is adjusted (110 V~150 V), the Marker is observed, and the electrophoresis can be stopped when the indicator band of the predyed protein Marker where the protein is located is properly separated. (Note that the current should not be too large when electrophoresis, too large current (more than 150 mA) will cause the temperature to rise, affecting the result of running glue. If high currents cannot be avoided, an ice bath can be used to cool the bath.)
Transfer membrane
1. Take out the converter, soak the clip and consumables in the pre-cooled converter;
2. Activate PVDF membrane with methanol for 1 min and rinse with transfer buffer;
3. Install it in the order of "black edge of clip - sponge - filter paper - filter paper - glue -PVDF membrane - filter paper - filter paper - sponge - white edge of clip"; 4. The protein was electrotransferred to PVDF membrane. ( 0.45 µm PVDF membrane is recommended ) Reference Table for Selecting PVDF Membrane Pore Size Specifications Recommended conditions for wet transfer: 200 mA, 120 min. ( Note that the transfer conditions can be adjusted according to the protein size. For high-molecular-weight proteins, a higher current and longer transfer time are recommended. However, ensure that the transfer tank remains at a low temperature to prevent gel melting.)
Block
1. After electrotransfer, wash the film with TBST at room temperature for 5 minutes;
2. Incubate the film in the blocking solution for 1 hour at room temperature;
3. Wash the film with TBST for 3 times, 5 minutes each time.
Antibody incubation
1. Use primary antibody dilution buffer to prepare the primary antibody working liquid (recommended dilution ratio for primary antibody 1:100), gently shake and incubate with the film at 4°C overnight; 2. Wash the film with TBST 3 times, 5 minutes each time;
3. Add the secondary antibody to the blocking solution and incubate with the film gently at room temperature for 1 hour;
4. After incubation, wash the film with TBST 3 times for 5 minutes each time.
Antibody staining
1. Add the prepared ECL luminescent substrate (or select other color developing substrate according to the second antibody) and mix evenly;
2. Incubate with the film for 1 minute, remove excess substrate (keep the film moist), wrap with plastic film, and expose in the imaging system. (Exposure time of at least 90s is recommended) |
| IF |
|---|
Experimental Protocol:
Sample Preparation
1. Adherent Cells: Place a clean, sterile coverslip in a culture dish. Once the cells grow to near confluence as a monolayer, remove the coverslip for further use.
2. Suspension Cells: Seed the cells onto a clean, sterile slide coated with poly-L-lysine.
3. Frozen Sections: Allow the slide to thaw at room temperature. Wash it with pure water or PBS for 2 times, 3 minutes each time.
4. Paraffin Sections: Deparaffinization and rehydration. Wash the slide with pure water or PBS for 3 times, 3 minutes each time. Then perform antigen retrieval.
Fixation
1. Fix the cell coverslips/spots or tissue sections at room temperature using a fixative such as 4% paraformaldehyde (4% PFA) for 10-15 minutes.
2. Wash the sample with PBS for 3 times, 3 minutes each time.
Permeabilization
1.Add a detergent such as 0.1–0.3% Triton X-100 to the sample and incubate at room temperature for 10–20 minutes.
(Note: This step is only required for intracellular antigens. For antigens expressed on the cell membrane, this step is unnecessary.)
Wash the sample with PBS for 3 times, 3 minutes each time.
Blocking
Add blocking solution and incubate at room temperature for at least 1 hour. (Common blocking solutions include: serum from the same source as the secondary antibody, BSA, or goat serum.)
Note: Ensure the sample remains moist during and after the blocking step to prevent drying, which can lead to high background.
Immunofluorescence Staining (Day 1)
1. Remove the blocking solution and add the diluted primary antibody.
2. Incubate the sample in a humidified chamber at 4°C overnight.
Immunofluorescence Staining (Day 2)
1. Remove the primary antibody and wash with PBST for 3 times, 5 minutes each time.
2. Add the diluted fluorescent secondary antibody and incubate in the dark at 4°C for 1–2 hours.
3. Remove the secondary antibody and wash with PBST for 3 times, 5 minutes each time.
4. Add diluted DAPI and incubate at room temperature in the dark for 5–10 minutes.
5. Wash with PBST for 3 times, 5 minutes each time.
Mounting
1. Mount the sample with an anti-fade mounting medium.
2. Allow the slide to dry at room temperature overnight in the dark.
3. Store the slide in a slide storage box at 4°C, protected from light.
|
Biological Description
| Specificity |
|---|
| PSMC2 Antibody (Mouse mAb) [A15H16] detects endogenous levels of total PSMC2 protein. |
| Subcellular Location |
|---|
| Cytoplasm, Proteasome |
| Uniprot ID |
|---|
| P35998 |
| Clone |
|---|
| A15H16 |
| Synonym(s) |
|---|
| PSMC2 |
| Background |
|---|
| PSMC2, also termed 26S proteasome regulatory subunit 7 or Rpt1, is an AAA‑ATPase of the 19S regulatory particle base that forms part of the heterohexameric ATPase ring responsible for substrate engagement, unfolding, and translocation into the 20S proteolytic core of the 26S proteasome. The protein belongs to the AAA family of P‑loop NTPases and contributes ATP‑binding and hydrolysis motifs that power conformational changes in the base, and together with the other five ATPase subunits and adjacent non‑ATPase scaffolds, it helps form the substrate‑processing channel that recognizes polyubiquitin‑tagged proteins, unfolds them, and threads them into the catalytic chamber for peptide bond cleavage. Within the 19S base, PSMC2 associates with partners including other ATPase subunits such as PSMC1 and PSMC4 and non‑ATPase subunits such as PSMD5, and it supports assembly and stability of the regulatory particle and its docking onto the 20S core, ensuring efficient coupling between ubiquitin recognition, deubiquitination, unfolding, and proteolysis. PSMC2 expression is detected in multiple tissues where constitutive proteasome activity is required to remove misfolded or damaged proteins, terminate signaling by timely degradation of regulatory factors, and generate peptides for MHC class I antigen presentation, linking this ATPase to cell cycle control, apoptosis, DNA damage responses, and immune surveillance as part of the core ubiquitin–proteasome system. PSMC2 displays context‑dependent regulatory functions in tumor biology: in breast cancer, PSMC2 overexpression promotes proliferation, colony formation, migration, and tumor growth, and mechanistic analyses show that PSMC2 interacts with urokinase‑type plasminogen activator (PLAU), enhances its protein abundance, and thereby supports plasminogen activation, matrix remodeling, and downstream signaling that favor tumor progression. PSMC2 is upregulated and associates with advanced clinicopathologic features; functional work links PSMC2 to activation of the mTOR pathway by increasing ribosomal protein S15A through regulation of hsa‑let‑7c‑3p, indicating that this ATPase connects proteasome function to translational control and growth signaling in this context. |
| References |
|---|
|
Tech Support
Tel: +1-832-582-8158 Ext:3
If you have any other enquiries, please leave a message.

Products are for research use only. Not for human use. We do not sell to patients.
©Copyright 2013 Selleck Chemicals. All Rights Reserved.