
-
 Australia
-
 Austria
-
 Belgium
-
 Brazil
-
 Canada
-
 China
China
-
 Czech Republic
-
 Denmark
-
 Finland
-
 France
-
 Germany
-
 Greece
-
 Hong Kong
-
 Hungary
-
 Iceland
-
 India
India
-
 Ireland
-
 Israel
-
 Italy
Italy
-
 Japan
Japan
-
 Korea
Korea
-
 Luxembourg
-
 Malaysia
-
 Netherlands
-
 New Zealand
-
 Norway
-
 Poland
-
 Qatar
Qatar
-
 Romania
-
 Saudi Arabia
-
 Singapore
-
 Spain
Spain
-
 Sweden
-
 Switzerland
-
 Taiwan
-
 Turkey
-
 United Kingdom
-
 United States
research use only
OTUB1 Antibody (Rabbit mAb) [N21M4]
Cat.No.: F7166
Application:
Reactivity:
-
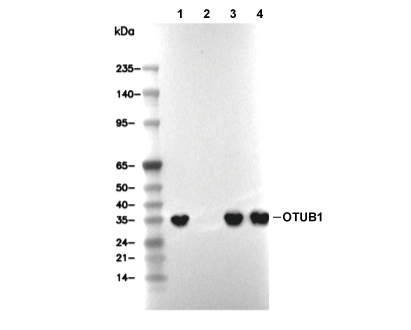 Lane 1: HEK293T, Lane 2: HEK293T (KO OTUB1), Lane 3: U-2 OS, Lane 4: Mouse brain
Experiment Essentials
WB
Recommended wet transfer conditions: 200 mA, 60 min.
Recommended wet transfer conditions: 200 mA, 60 min.
Usage Information
| Dilution |
|---|
|
| Application |
|---|
| WB, IP, IF, FCM |
| Reactivity |
|---|
| Human, Mouse, Rat |
| Source |
|---|
| Rabbit Monoclonal Antibody |
| Storage Buffer |
|---|
| PBS, pH 7.2+50% Glycerol+0.05% BSA+0.01% NaN3 |
| Storage (from the date of receipt) |
|---|
| -20°C (avoid freeze-thaw cycles), 2 years |
| Predicted MW |
|---|
| 31 kDa |
| Positive Control | Mouse liver tissue; Mouse brain tissue; Rat liver tissue; Rat brain tissue; HEK293T cells; HeLa cells; MCF7 cells; U-2 OS cells; C6 cells; RAW264.7 cells; PC-12 cells; NIH/3T3 cells |
|---|---|
| Negative Control |
Experimental Methods
| WB |
|---|
Experimental Protocol:
Sample preparation
1. Tissue: Lyse the tissue sample by adding an appropriate volume of ice-cold RIPA/Tris-HCL Lysis Buffer (containing Protease Inhibitor Cocktail),and homogenize the tissue at a low temperature or lyse it by sonication on ice, then incubate on ice for 30 minutes. 2. Adherent cell: Aspirate the culture medium and wash the cells with ice-cold PBS twice. Lyse the cells by adding an appropriate volume of RIPA/Tris-HCL Lysis Buffer (containing Protease Inhibitor Cocktail) , sonicate to lyse the cells, and incubate on ice for 30 minutes. 3. Suspension cell: Transfer the culture medium to a pre-cooled centrifuge tube. Centrifuge and aspirate the supernatant. Wash the cells with ice-cold PBS twice. Lyse the cells by adding an appropriate volume of RIPA/Tris-HCL Lysis Buffer (containing Protease Inhibitor Cocktail) , sonicate to lyse the cells, and incubate on ice for 30 minutes. 4. Place the lysate into a pre-cooled microcentrifuge tube. Centrifuge at 4°C for 15 min. Collect the supernatant;
5. Remove a small volume of lysate to determine the protein concentration;
6. Combine the lysate with protein loading buffer. Boil 20 µL sample under 95-100°C for 5 min. Centrifuge for 5 min after cool down on ice.
Electrophoretic separation
1. According to the concentration of extracted protein, load appropriate amount of protein sample and marker onto SDS-PAGE gels for electrophoresis. Recommended separating gel (lower gel) concentration: 10%. Reference Table for Selecting SDS-PAGE Separation Gel Concentrations 2. Power up 80V for 30 minutes. Then the power supply is adjusted (110 V~150 V), the Marker is observed, and the electrophoresis can be stopped when the indicator band of the predyed protein Marker where the protein is located is properly separated. (Note that the current should not be too large when electrophoresis, too large current (more than 150 mA) will cause the temperature to rise, affecting the result of running glue. If high currents cannot be avoided, an ice bath can be used to cool the bath.)
Transfer membrane
1. Take out the converter, soak the clip and consumables in the pre-cooled converter;
2. Activate PVDF membrane with methanol for 1 min and rinse with transfer buffer;
3. Install it in the order of "black edge of clip - sponge - filter paper - filter paper - glue -PVDF membrane - filter paper - filter paper - sponge - white edge of clip"; 4. The protein was electrotransferred to PVDF membrane. ( 0.45 µm PVDF membrane is recommended ) Reference Table for Selecting PVDF Membrane Pore Size Specifications Recommended conditions for wet transfer: 200 mA, 60 min. ( Note that the transfer conditions can be adjusted according to the protein size. For high-molecular-weight proteins, a higher current and longer transfer time are recommended. However, ensure that the transfer tank remains at a low temperature to prevent gel melting.)
Block
1. After electrotransfer, wash the film with TBST at room temperature for 5 minutes;
2. Incubate the film in the blocking solution for 1 hour at room temperature;
3. Wash the film with TBST for 3 times, 5 minutes each time.
Antibody incubation
1. Use 5% skim milk powder to prepare the primary antibody working liquid (recommended dilution ratio for primary antibody 1:1000), gently shake and incubate with the film at 4°C overnight; 2. Wash the film with TBST 3 times, 5 minutes each time;
3. Add the secondary antibody to the blocking solution and incubate with the film gently at room temperature for 1 hour;
4. After incubation, wash the film with TBST 3 times for 5 minutes each time.
Antibody staining
1. Add the prepared ECL luminescent substrate (or select other color developing substrate according to the second antibody) and mix evenly;
2. Incubate with the film for 1 minute, remove excess substrate (keep the film moist), wrap with plastic film, and expose in the imaging system. |
| IF |
|---|
Experimental Protocol:
Sample Preparation
1. Adherent Cells: Place a clean, sterile coverslip in a culture dish. Once the cells grow to near confluence as a monolayer, remove the coverslip for further use.
2. Suspension Cells: Seed the cells onto a clean, sterile slide coated with poly-L-lysine.
3. Frozen Sections: Allow the slide to thaw at room temperature. Wash it with pure water or PBS for 2 times, 3 minutes each time.
4. Paraffin Sections: Deparaffinization and rehydration. Wash the slide with pure water or PBS for 3 times, 3 minutes each time. Then perform antigen retrieval.
Fixation
1. Fix the cell coverslips/spots or tissue sections at room temperature using a fixative such as 4% paraformaldehyde (4% PFA) for 10-15 minutes.
2. Wash the sample with PBS for 3 times, 3 minutes each time.
Permeabilization
1.Add a detergent such as 0.1–0.3% Triton X-100 to the sample and incubate at room temperature for 10–20 minutes.
(Note: This step is only required for intracellular antigens. For antigens expressed on the cell membrane, this step is unnecessary.)
Wash the sample with PBS for 3 times, 3 minutes each time.
Blocking
Add blocking solution and incubate at room temperature for at least 1 hour. (Common blocking solutions include: serum from the same source as the secondary antibody, BSA, or goat serum.)
Note: Ensure the sample remains moist during and after the blocking step to prevent drying, which can lead to high background.
Immunofluorescence Staining (Day 1)
1. Remove the blocking solution and add the diluted primary antibody.
2. Incubate the sample in a humidified chamber at 4°C overnight.
Immunofluorescence Staining (Day 2)
1. Remove the primary antibody and wash with PBST for 3 times, 5 minutes each time.
2. Add the diluted fluorescent secondary antibody and incubate in the dark at 4°C for 1–2 hours.
3. Remove the secondary antibody and wash with PBST for 3 times, 5 minutes each time.
4. Add diluted DAPI and incubate at room temperature in the dark for 5–10 minutes.
5. Wash with PBST for 3 times, 5 minutes each time.
Mounting
1. Mount the sample with an anti-fade mounting medium.
2. Allow the slide to dry at room temperature overnight in the dark.
3. Store the slide in a slide storage box at 4°C, protected from light.
|
Biological Description
| Specificity |
|---|
| OTUB1 Antibody (Rabbit mAb) [N21M4] detects endogenous levels of total OTUB1 protein. |
| Subcellular Location |
|---|
| Cytoplasm |
| Uniprot ID |
|---|
| Q96FW1 |
| Clone |
|---|
| N21M4 |
| Synonym(s) |
|---|
| OTB1, OTU1, HSPC263, OTUB1, Ubiquitin thioesterase OTUB1, Deubiquitinating enzyme OTUB1, OTU domain-containing ubiquitin aldehyde-binding protein 1, Otubain-1, Ubiquitin-specific-processing protease OTUB1, hOTU1 |
| Background |
|---|
| OTUB1 is an OTU family deubiquitinase that regulates protein ubiquitination both by directly cleaving ubiquitin chains and by non‑catalytically blocking ubiquitin transfer, giving it a central role in tuning protein stability and signaling outputs downstream of multiple receptors. The protein contains an OTU catalytic domain with a conserved cysteine–histidine active site that can hydrolyze K48‑ and K63‑linked ubiquitin chains, and flanking N‑ and C‑terminal regions that engage E2 enzymes and ubiquitin‑loaded complexes, allowing OTUB1 to sense ubiquitin linkage type and interaction partners before deciding between catalytic and non‑catalytic modes of action. OTUB1 docks onto ubiquitin‑charged E2 conjugating enzymes such as UBE2N/UBE2D through defined interfaces and, when engaged with a proximal ubiquitin, can allosterically inhibit further ubiquitin transfer without necessarily promoting chain cleavage, so OTUB1 can stabilize substrates by shutting down E2 activity at specific signaling nodes. This non‑canonical inhibition is prominent in pathways controlled by c‑IAP1 and TNF receptor signaling, where OTUB1 limits K63‑ and linear ubiquitination events that would otherwise promote recruitment of TAK1, IKK complexes, and downstream NF‑κB activation, thereby restraining inflammatory and survival signaling and tuning the balance between pro‑ and anti‑apoptotic outputs. OTUB1 also deubiquitinates or protects regulators of the DNA damage response, including factors in the ubiquitin‑dependent ATM/ATR networks, positioning it as a modulator of checkpoint control, repair complex assembly, and recovery from genotoxic stress. OTUB1 as a frequently upregulated deubiquitinase that stabilizes oncogenic or pro‑survival substrates by preventing their proteasomal degradation, supports epithelial–mesenchymal transition and migration through regulation of EMT‑linked transcription factors and cytoskeletal regulators, and contributes to drug resistance by maintaining levels of checkpoint and immune‑evasive proteins such as PD‑L1 in specific tumor contexts. OTUB1 also has amyloidogenic properties and can form ordered aggregates, and its involvement in maintaining proteostasis via control of ubiquitin turnover connects it to pathways that determine neuronal vulnerability to misfolded proteins and stress. |
| References |
|---|
|
Tech Support
Tel: +1-832-582-8158 Ext:3
If you have any other enquiries, please leave a message.

Products are for research use only. Not for human use. We do not sell to patients.
©Copyright 2013 Selleck Chemicals. All Rights Reserved.