|
How to Cite 1. For In-Text Citation (Materials & Methods): 2. For Key Resources Table: |
||
|
Toll Free: (877) 796-6397 -- USA and Canada only -- |
Fax: +1-832-582-8590 Orders: +1-832-582-8158 |
Tech Support: +1-832-582-8158 Ext:3 Please provide your Order Number in the email. We strive to reply to |
Biological Description
| Specificity | XIAP Antibody [L24L9] detects endogenous levels of total XIAP protein. |
|---|---|
| Background | XIAP, the most potent human IAP family member at 497 amino acids that directly suppresses apoptosis execution by binding active caspases through three tandem N-terminal BIR domains, BIR1 to BIR3, each about 70 amino acids and forming Zn²⁺-chelated three-helix bundles, a UBA ubiquitin-binding module, and a C-terminal RING E3 ligase domain spanning amino acids 354 to 447 with a C3HC4 motif for autoubiquitylation and substrate degradation. The BIR2 domain, amino acids 132 to 195, uses its linker loop to insert into caspase-3 and caspase-7 active sites, blocking catalysis via His237 and Arg237 contacts, while the BIR3 domain, amino acids 249 to 309, binds the caspase-9 monomer through a Smac-binding groove, also known as the IBD pocket, where Trp323 and His322 form a hydrophobic clamp on the N-terminal AVPI motif; BIR1 stabilizes the complex, and the RING domain ubiquitinates caspases and Smac for proteasomal degradation. XIAP is a caspase blocker that potently inhibits extrinsic apoptosis through caspase-8 and caspase-10 by preventing BID cleavage and intrinsic apoptosis at the caspase-9 apoptosome, sequestering processed caspases after activation. XIAP also activates non-canonical NF-κB signaling via RIPK1 or RIPK2 ubiquitylation, which promotes survival and inflammation, and has mitochondrial roles that enhance resistance to outer membrane permeabilization. XIAP is essential for immune homeostasis, supporting T and NK cell survival, maintaining epithelial integrity, and proper development, with X-linked lymphoproliferative syndrome resulting from mutations; Smac or DIABLO proteins relieve XIAP inhibition by competitively binding BIR2 and BIR3. XIAP overexpression drives chemoresistance and tumorigenesis in carcinomas by stabilizing caspases and activating NF-κB, and is targeted therapeutically by Smac-mimetics. Hemizygous loss of XIAP causes XLP-2, which leads to fatal EBV-associated lymphoproliferation. |
Usage Information
| Application | WB | Dilution |
|
||
|---|---|---|---|---|---|
| Reactivity | Human, Monkey | ||||
| Source | Rabbit Monoclonal Antibody | MW | 53 kDa | ||
| Storage Buffer | PBS, pH 7.2+50% Glycerol+0.05% BSA+0.01% NaN3 | Storage (from the date of receipt) |
-20°C (avoid freeze-thaw cycles), 2 years | ||
| WB |
Experimental Protocol:
Sample preparation
1. Tissue: Lyse the tissue sample by adding an appropriate volume of ice-cold RIPA/NP-40 Lysis Buffer (containing Protease Inhibitor Cocktail),and homogenize the tissue at a low temperature. 2. Adherent cell: Aspirate the culture medium and wash the cells with ice-cold PBS twice. Lyse the cells by adding an appropriate volume of RIPA/NP-40 Lysis Buffer (containing Protease Inhibitor Cocktail) and put the sample on ice for 5 min. 3. Suspension cell: Transfer the culture medium to a pre-cooled centrifuge tube. Centrifuge and aspirate the supernatant. Wash the cells with ice-cold PBS twice. Lyse the cells by adding an appropriate volume of RIPA/NP-40 Lysis Buffer (containing Protease Inhibitor Cocktail) and put the sample on ice for 5 min. 4. Place the lysate into a pre-cooled microcentrifuge tube. Centrifuge at 4°C for 15 min. Collect the supernatant;
5. Remove a small volume of lysate to determine the protein concentration;
6. Combine the lysate with protein loading buffer. Boil 20 µL sample under 95-100°C for 5 min. Centrifuge for 5 min after cool down on ice.
2. Power up 80V for 30 minutes. Then the power supply is adjusted (110 V~150 V), the Marker is observed, and the electrophoresis can be stopped when the indicator band of the predyed protein Marker where the protein is located is properly separated. (Note that the current should not be too large when electrophoresis, too large current (more than 150 mA) will cause the temperature to rise, affecting the result of running glue. If high currents cannot be avoided, an ice bath can be used to cool the bath.)
Transfer membrane
1. Take out the converter, soak the clip and consumables in the pre-cooled converter;
2. Activate PVDF membrane with methanol for 1 min and rinse with transfer buffer;
3. Install it in the order of "black edge of clip - sponge - filter paper - filter paper - glue -PVDF membrane - filter paper - filter paper - sponge - white edge of clip"; 4. The protein was electrotransferred to PVDF membrane. ( 0.45 µm PVDF membrane is recommended ) Reference Table for Selecting PVDF Membrane Pore Size Specifications Recommended conditions for wet transfer: 200 mA, 120 min. ( Note that the transfer conditions can be adjusted according to the protein size. For high-molecular-weight proteins, a higher current and longer transfer time are recommended. However, ensure that the transfer tank remains at a low temperature to prevent gel melting.)
Block
1. After electrotransfer, wash the film with TBST at room temperature for 5 minutes;
2. Incubate the film in the blocking solution for 1 hour at room temperature;
3. Wash the film with TBST for 3 times, 5 minutes each time.
Antibody incubation
1. Use 5% skim milk powder to prepare the primary antibody working liquid (recommended dilution ratio for primary antibody 1:1000), gently shake and incubate with the film at 4°C overnight; 2. Wash the film with TBST 3 times, 5 minutes each time;
3. Add the secondary antibody to the blocking solution and incubate with the film gently at room temperature for 1 hour;
4. After incubation, wash the film with TBST 3 times for 5 minutes each time.
Antibody staining
1. Add the prepared ECL luminescent substrate (or select other color developing substrate according to the second antibody) and mix evenly;
2. Incubate with the film for 1 minute, remove excess substrate (keep the film moist), wrap with plastic film, and expose in the imaging system.
|
References
|
Application Data
WB
Validated by Selleck
-
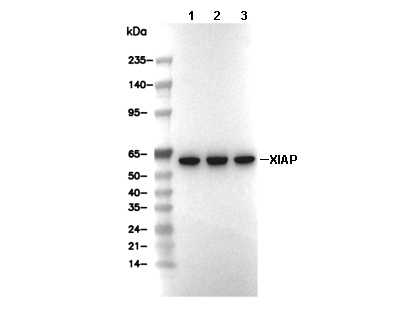 Lane 1: Hela, Lane 2: Raji, Lane 3: COS