
|
How to Cite 1. For In-Text Citation (Materials & Methods): 2. For Key Resources Table: |
||
|
Toll Free: (877) 796-6397 -- USA and Canada only -- |
Fax: +1-832-582-8590 Orders: +1-832-582-8158 |
Tech Support: +1-832-582-8158 Ext:3 Please provide your Order Number in the email. We strive to reply to |
Biological Description
| Specificity | TGF β1 Antibody (Rabbit mAb) [N23L9] detects endogenous levels of total TGF β1 protein. |
|---|---|
| Background | TGF-β1 belongs to the transforming growth factor-β superfamily of secreted cytokines and is synthesized as a proprotein cleaved by furin into two non-covalently associated chains, the latency-associated peptide and mature TGF-β1, which together form a ring-shaped latent complex that sterically shields the growth factor from receptor engagement. This latent complex is tethered within the extracellular matrix through disulfide-linked association with latent TGF-β binding proteins, holding TGF-β1 in an inactive, storage-competent state until a local activation signal is received. Activation requires αv integrins binding an RGD motif within the latency-associated peptide and exerting mechanical force on this domain, a process resisted by the matrix anchoring of the latent complex, and this force-dependent unfastening deforms the prodomain sufficiently to expose the receptor-binding surface of mature TGF-β1 without necessarily releasing it from the complex entirely. Once accessible, TGF-β1 binds the constitutively active type II receptor, TGFBR2, which recruits and trans-phosphorylates the type I receptor, TGFBR1, on serine residues within its juxtamembrane GS domain. Activated TGFBR1 then phosphorylates SMAD2 and SMAD3 at two C-terminal serine residues, triggering their dissociation from the receptor complex and association with SMAD4 to form a heteromeric complex that translocates to the nucleus and regulates transcription of TGF-β1 target genes. Distinct phosphorylation patterns on the SMAD2/3 linker versus C-terminal regions determine whether downstream signaling favors cytostatic, mitogenic, or fibrogenic transcriptional outcomes, giving the pathway context-dependent functional flexibility despite a shared core receptor mechanism. Because activation is restricted to sites where integrin engagement and mechanical force converge, TGF-β1 signaling remains highly localized despite broad tissue-level expression, a regulatory feature that governs bone formation, T-helper 17 versus regulatory T-cell lineage commitment, and epithelial-to-mesenchymal transition, and whose dysregulation contributes to fibrotic and immune-related disease. |
Usage Information
| Application | WB | Dilution |
|
||
|---|---|---|---|---|---|
| Reactivity | Mouse, Rat, Human | ||||
| Source | Rabbit Monoclonal Antibody | MW | 44 kDa | ||
| Storage Buffer | PBS, pH 7.2+50% Glycerol+0.05% BSA+0.01% NaN3 | Storage (from the date of receipt) |
-20°C (avoid freeze-thaw cycles), 2 years | ||
| WB |
Experimental Protocol:
Sample preparation
1. Tissue: Lyse the tissue sample by adding an appropriate volume of ice-cold RIPA/NP-40 Lysis Buffer (containing Protease Inhibitor Cocktail),and homogenize the tissue at a low temperature or lyse it by sonication on ice, then incubate on ice for 30 minutes. 2. Adherent cell: Aspirate the culture medium and wash the cells with ice-cold PBS twice. Lyse the cells by adding an appropriate volume of RIPA/NP-40 Lysis Buffer (containing Protease Inhibitor Cocktail) , sonicate to lyse the cells, and incubate on ice for 30 minutes. 3. Suspension cell: Transfer the culture medium to a pre-cooled centrifuge tube. Centrifuge and aspirate the supernatant. Wash the cells with ice-cold PBS twice. Lyse the cells by adding an appropriate volume of RIPA/NP-40 Lysis Buffer (containing Protease Inhibitor Cocktail) , sonicate to lyse the cells, and incubate on ice for 30 minutes. 4. Place the lysate into a pre-cooled microcentrifuge tube. Centrifuge at 4°C for 15 min. Collect the supernatant;
5. Remove a small volume of lysate to determine the protein concentration;
6. Combine the lysate with protein loading buffer. Boil 20 µL sample under 95-100°C for 5 min. Centrifuge for 5 min after cool down on ice.
Electrophoretic separation
1. According to the concentration of extracted protein, load appropriate amount of protein sample and marker onto SDS-PAGE gels for electrophoresis. Recommended separating gel (lower gel) concentration: 10%. Reference Table for Selecting SDS-PAGE Separation Gel Concentrations 2. Power up 80V for 30 minutes. Then the power supply is adjusted (110 V~150 V), the Marker is observed, and the electrophoresis can be stopped when the indicator band of the predyed protein Marker where the protein is located is properly separated. (Note that the current should not be too large when electrophoresis, too large current (more than 150 mA) will cause the temperature to rise, affecting the result of running glue. If high currents cannot be avoided, an ice bath can be used to cool the bath.)
Transfer membrane
1. Take out the converter, soak the clip and consumables in the pre-cooled converter;
2. Activate PVDF membrane with methanol for 1 min and rinse with transfer buffer;
3. Install it in the order of "black edge of clip - sponge - filter paper - filter paper - glue -PVDF membrane - filter paper - filter paper - sponge - white edge of clip"; 4. The protein was electrotransferred to PVDF membrane. ( 0.45 µm PVDF membrane is recommended ) Reference Table for Selecting PVDF Membrane Pore Size Specifications Recommended conditions for wet transfer: 200 mA, 120 min. ( Note that the transfer conditions can be adjusted according to the protein size. For high-molecular-weight proteins, a higher current and longer transfer time are recommended. However, ensure that the transfer tank remains at a low temperature to prevent gel melting.)
Block
1. After electrotransfer, wash the film with TBST at room temperature for 5 minutes;
2. Incubate the film in the blocking solution for 1 hour at room temperature;
3. Wash the film with TBST for 3 times, 5 minutes each time.
Antibody incubation
1. Use primary antibody dilution buffer to prepare the primary antibody working liquid (recommended dilution ratio for primary antibody 1:5000), gently shake and incubate with the film at 4°C overnight; 2. Wash the film with TBST 3 times, 5 minutes each time;
3. Add the secondary antibody to the blocking solution and incubate with the film gently at room temperature for 1 hour;
4. After incubation, wash the film with TBST 3 times for 5 minutes each time.
Antibody staining
1. Add the prepared ECL luminescent substrate (or select other color developing substrate according to the second antibody) and mix evenly;
2. Incubate with the film for 1 minute, remove excess substrate (keep the film moist), wrap with plastic film, and expose in the imaging system.
|
References
|
Application Data
WB
Validated by Selleck
-
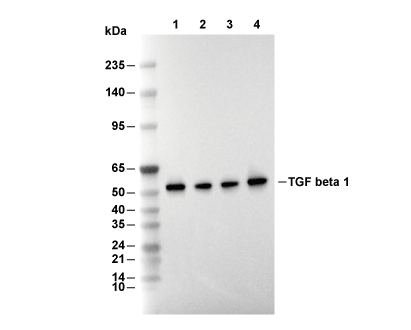 Lane 1: K562, Lane 2: SH-SY5Y, Lane 3: L-929, Lane 4: Mouse spleen