|
Toll Free: (877) 796-6397 -- USA and Canada only -- |
Fax: +1-832-582-8590 Orders: +1-832-582-8158 |
Tech Support: +1-832-582-8158 Ext:3 Please provide your Order Number in the email. |
Biological Description
| Specificity | Phospho-Histone H2B (Ser14) Rabbit mAb recognizes endogenous levels of histone H2B protein only when phosphorylated at Ser14. The antibody may cross-react with a nonspecific band at 30 kDa. |
|---|---|
| Background | Histone H2B is essential for chromatin dynamics and DNA repair, with its posttranslational modifications playing crucial roles in these processes. Among these, the phosphorylation of Serine 14 (Ser14) in histone H2B is a significant marker in the cellular response to DNA double-strand breaks (DSBs). Phosphorylation at Ser14 (H2B-Ser14P) is associated with DSBs and contributes to the formation of irradiation-induced foci (IRIF), which are crucial for the localization of DNA damage and repair factors at the site of the break. While γ-H2AX is vital for the initial recognition of DSBs and chromatin remodeling, the formation of H2B-Ser14P IRIF depends on γ-H2AX and phosphatidylinositol-3-OH kinase–related kinases (PIKKs). This modification is crucial for establishing a chromatin environment that supports effective DNA repair processes. |
Usage Information
| Application | WB, IP | Dilution |
|
||||
|---|---|---|---|---|---|---|---|
| Reactivity | Human, Mouse, Rat, Monkey, Bovine, Pig, Horse | ||||||
| Source | Rabbit | MW | 14 Kda | ||||
| Storage Buffer | PBS, pH 7.2+50% Glycerol+0.05% BSA+0.01% NaN₃ | Storage (from the date of receipt) |
–20°C (avoid freeze-thaw cycles), 2 years | ||||
| WB |
Experimental Protocol:
Sample preparation
1. Tissue: Lyse the tissue sample by adding an appropriate volume of ice-cold RIPA/Nuclear Lysis Buffer (containing Protease Inhibitor Cocktail, Phosphatase Inhibitor Cocktail),and homogenize the tissue at a low temperature or lyse it by sonication on ice, then incubate on ice for 30 minutes. 2. Adherent cell: Aspirate the culture medium and transfer the cells into an EP tube. Wash the cells with ice-cold PBS twice. Add an appropriate volume of RIPA/Nuclear Lysis Buffer (containing Protease Inhibitor Cocktail, Phosphatase Inhibitor Cocktail), sonicate to lyse the cells, and incubate on ice for 30 minutes. 3. Suspension cell: Transfer the culture medium to a pre-cooled centrifuge tube. Centrifuge and aspirate the supernatant. Wash the cells with ice-cold PBS twice.Add an appropriate volume of RIPA/Nuclear Lysis Buffer (containing Protease Inhibitor Cocktail, Phosphatase Inhibitor Cocktail), sonicate to lyse the cells, and incubate on ice for 30 minutes. 4. Place the lysate into a pre-cooled microcentrifuge tube. Centrifuge at 4°C for 15 min. Collect the supernatant;
5. Remove a small volume of lysate to determine the protein concentration;
6. Combine the lysate with protein loading buffer. Boil 20 µL sample under 95-100°C for 5 min. Centrifuge for 5 min after cool down on ice.
Electrophoretic separation
1. According to the concentration of extracted protein, load appropriate amount of protein sample and marker onto SDS-PAGE gels for electrophoresis. Recommended separating gel (lower gel) concentration: 20%. Reference Table for Selecting SDS-PAGE Separation Gel Concentrations 2. Power up 80V for 30 minutes. Then the power supply is adjusted (110 V~150 V), the Marker is observed, and the electrophoresis can be stopped when the indicator band of the predyed protein Marker where the protein is located is properly separated. (Note that the current should not be too large when electrophoresis, too large current (more than 150 mA) will cause the temperature to rise, affecting the result of running glue. If high currents cannot be avoided, an ice bath can be used to cool the bath.)
Transfer membrane
1. Take out the converter, soak the clip and consumables in the pre-cooled converter;
2. Activate PVDF membrane with methanol for 1 min and rinse with transfer buffer;
3. Install it in the order of "black edge of clip - sponge - filter paper - filter paper - glue -PVDF membrane - filter paper - filter paper - sponge - white edge of clip"; 4. The protein was electrotransferred to PVDF membrane. ( 0.22 µm PVDF membrane is recommended )) Reference Table for Selecting PVDF Membrane Pore Size Specifications Recommended conditions for wet transfer: 200 mA, 60 min. ( Note that the transfer conditions can be adjusted according to the protein size. For high-molecular-weight proteins, a higher current and longer transfer time are recommended. However, ensure that the transfer tank remains at a low temperature to prevent gel melting.)
Block
1. After electrotransfer, wash the film with TBST at room temperature for 5 minutes;
2. Incubate the film in the blocking solution ( recommending 5% BSA solution)
for 1 hour at room temperature;
3. Wash the film with TBST for 3 times, 5 minutes each time.
Antibody incubation
1. Use 5% skim milk powder to prepare the primary antibody working liquid (recommended dilution ratio for primary antibody 1:1000), gently shake and incubate with the film at 4°C overnight; 2. Wash the film with TBST 3 times, 5 minutes each time;
3. Add the secondary antibody to the blocking solution and incubate with the film gently at room temperature for 1 hour;
4. After incubation, wash the film with TBST 3 times for 5 minutes each time.
Antibody staining
809. Add the prepared ECL luminescent substrate (or select other color developing substrate according to the second antibody) and mix evenly;
2. Incubate with the film for 1 minute, remove excess substrate (keep the film moist), wrap with plastic film, and expose in the imaging system.
|
| WB |
Western Blotting
Sample preparation
1. Aspirate media from cultures and Wash the cells with 1X PBS.
2. Lyse cells by adding 1X SDS sample buffer and transfer the extract to a microcentrifuge tube. Keep onice.
3. Sonicate for 10–15 sec to complete cell lysis and shear DNA.
4. Heat a 20 µl sample to 95–100°C for 5 min, then cool on ice.
5. Centrifuge for 5 min (with Microcentrifuge).
6. Load appropriate volumes of samples onto SDS-PAGE gel (loading quantity of protein sample depends on the concentration of extracted proteins).
NOTE: At the same time, please load the pre-stained molecular weight markers to determine molecular weights and verify electrotransfer.
7. Electrotransfer to nitrocellulose/PVDF membrane (For wet transfer: 150mA 50min).
Membrane Blocking and Antibody Incubations
a. Blocking
1. (Optional) After transfer, wash the transferred membrane with TBS for 5 min at room temperature.
2. Incubate the membrane in the blocking buffer for 1 hr at room temperature.
3. Wash three times for 5 min each with TBST.
b. Antibodies Incubation
1. Incubate membrane and primary antibody (at the appropriate dilution and diluent recommended) in a primary antibody dilution buffer with gentle agitation overnight at 4°C.
2. Wash three times for 5 min each with TBST.
3. Incubate membrane with an appropriate second antibodydissolved in the blocking buffer with gentle agitation for 1 hr at room temperature.
4. Wash three times for 5 min each with TBST.
5. Proceed with detection.
Detection of Proteins
1. After antibodies incubation, Wash membrane three times for 5 minutes in TBST.
2. PrepareECL Reagent (or other chromogenic agents/substrate according to your second antibody). Mix well.
3. Incubate substrate with membrane for 1 minute, remove excess solution (membrane remains wet), wrap in plastic and expose in the imaging system.
|
Application Data
WB
Validated by Selleck
-
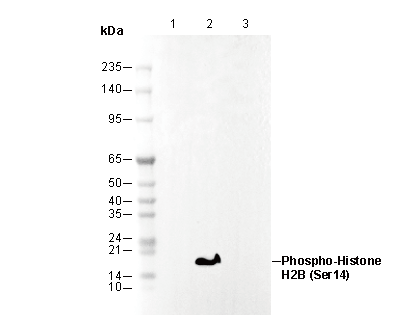 Lane 1: HL-60
Lane 2: HL-60(etoposide-treated, 50 μM, 6 hr )
Lane 3: HL-60(etoposide-treated, 50 μM, 6 hr; λ phosphatase treated)