
|
How to Cite 1. For In-Text Citation (Materials & Methods): 2. For Key Resources Table: |
||
|
Toll Free: (877) 796-6397 -- USA and Canada only -- |
Fax: +1-832-582-8590 Orders: +1-832-582-8158 |
Tech Support: +1-832-582-8158 Ext:3 Please provide your Order Number in the email. We strive to reply to |
Biological Description
| Specificity | HTRA1/PRSS11 Antibody (Mouse mAb) [H14H15] detects endogenous levels of total HTRA1/PRSS11 proteins. |
|---|---|
| Background | HTRA1 (high temperature requirement A1, encoded by PRSS11) is a secreted, PDZ domain-containing serine protease of the bacterial HtrA-related family, and it assembles into a homotrimer whose proteolytic activity is directed against a range of extracellular matrix and growth-factor-regulatory proteins. HTRA1 cleaves and inhibits TGF-beta family signaling and processes several extracellular matrix components including fibronectin, and proteomic comparison of retinal pigment epithelial cells carrying the age-related macular degeneration risk allele at the 10q26 locus, which increases HTRA1 expression, identifies EFEMP1 and thrombospondin-1 as two additional direct substrates of HTRA1, alongside its previously known targets LTBP-1 and clusterin; EFEMP1 is itself a fibrillin microfibril component whose R345W mutant form causes Doyne honeycomb retinal dystrophy, a disease clinically resembling AMD, so HTRA1's processing of this substrate directly links the AMD risk allele's increased protease activity to disruption of the same extracellular matrix component implicated in a related retinal degenerative disease. Consistent with a causal proteolytic mechanism rather than simple correlation, mice engineered to overexpress HTRA1 develop a fragmented elastic network within the extracellular matrix layer between the retinal pigment epithelium and the choroid, reproducing a structural abnormality relevant to AMD pathology and directly demonstrating that excess HTRA1 proteolytic activity alone is sufficient to degrade this matrix architecture in vivo. The catalytic mechanism of HTRA1 has been resolved structurally: cryo-electron microscopy and X-ray crystallography of the trimeric protease bound to a clinical Fab fragment developed as a therapeutic candidate for geographic atrophy, the advanced, currently untreatable form of AMD, show that the Fab binds an exposed loop roughly 30 angstroms away from HTRA1's catalytic active site, and this remote binding locks HTRA1 into a non-catalytically-competent conformation through allosteric inhibition, providing both a detailed structural mechanism for HTRA1 regulation and the basis for a therapeutic strategy that blocks HTRA1 activity without directly targeting its active site. Because elevated HTRA1 expression from the 10q26 risk allele drives excess degradation of key extracellular matrix and TGF-beta pathway components implicated in drusen formation and Bruch's membrane integrity, and because separate HTRA1 mutations cause the inherited vascular disease CARASIL, HTRA1's proteolytic activity toward this defined substrate set connects a single enzyme to both a common polygenic retinal disease and a rare monogenic vascular disorder. |
Usage Information
| Application | WB, IP | Dilution |
|
||||
|---|---|---|---|---|---|---|---|
| Reactivity | Human | ||||||
| Source | Mouse Monoclonal Antibody | MW | 51 kDa | ||||
| Storage Buffer | PBS, pH 7.2+50% Glycerol+0.05% BSA+0.01% NaN3 | Storage (from the date of receipt) |
-20°C (avoid freeze-thaw cycles), 2 years | ||||
| IP |
Experimental Procedure:
Reagents and Preparation
1. Basic buffers: 1× PBS or 1× TBS (pre-chilled on ice); 1× cell lysis buffer (add 1 mM PMSF protease inhibitor immediately before use; add phosphatase inhibitors for phosphoproteins).
2. Capture medium: Protein A/G magnetic beads or agarose beads (Sepharose beads).
3. Controls: Use an isotype control IgG matching the host species and IgG subclass of the primary antibody, at the same concentration. It is recommended to reserve a portion of the cell lysate that has not been subjected to immunoprecipitation as the Input control; if necessary, a beads-only control (beads added without antibody) may also be included.
4. Loading and elution reagents: 3× or 4× SDS sample loading buffer (containing DTT/reducing agent); if non-denaturing elution is to be performed, prepare the corresponding elution buffer and neutralization buffer separately; for denaturing elution, 1× PBS is typically used to dilute the 3× or 4× SDS sample loading buffer to 1×.
Cell Lysis and Sample Preparation (Native Protein Extraction)
1. Cell harvesting: Discard the culture medium and wash the cells once with ice-cold 1× PBS.
2. Cell lysis: Add 0.5–1 mL of ice-cold 1× cell lysis buffer to a 10-cm culture dish and incubate on ice for 5–10 minutes.
3. Lysate collection and clarification: Scrape the cells and transfer the lysate to a microcentrifuge tube. Some adherent cells may require detachment using digestive enzymes or mechanical methods. Centrifuge at 14,000 rpm at 4°C for 5–15 min. Collect the supernatant as the clarified cell lysate. It is recommended to determine the protein concentration.
Pre-clearing and Immunoprecipitation Reaction
1. Pre-clearing of the lysate (recommended): Take an appropriate amount of beads (magnetic beads or agarose beads) and pre-wash 2–3 times with cell lysis buffer or 1× TBS/PBS. After pre-washing, it is recommended to remove the wash buffer as completely as possible before adding subsequent reagents, to avoid extra dilution of the sample. For lysis systems containing detergents or specific salt concentrations, prefer pre-washing with a buffer identical or compatible with the lysis buffer to minimize buffer-system mismatches.
2. Pre-clearing treatment: Mix the cell lysate with the pre-washed beads and incubate with rotation at room temperature for 30–60 min, or at 4°C with rotation for 1–2 h.
When using agarose beads, pellet the beads by centrifugation after incubation and collect the supernatant.
When using magnetic beads, separate the beads using a magnetic stand after incubation and collect the supernatant.
This step removes proteins that bind non-specifically to the beads. For unstable proteins, phosphoproteins, or protein complexes, incubation at 4°C is preferred to minimize protein degradation, dephosphorylation, or complex dissociation. Beads used for pre-clearing should generally not be pre-coupled with a specific antibody, to avoid loss of the target antigen.
3. Formation of the “bead–antibody–antigen” immunocomplex
Either of the following two approaches may be used:
3.1 Pre-form the antibody–antigen complex, then add the beads: Add an appropriate amount of primary antibody to the pre-cleared supernatant obtained in step 2, and set up an isotype control IgG group in parallel. Incubate with rotation at 4°C overnight (recommended), or at room temperature with rotation for 2 h, to allow formation of the antibody–antigen complex.
In parallel, take an appropriate amount of beads and pre-wash them as described in step 1 of this section. Add the antibody–antigen complex to the pre-washed magnetic or agarose beads and incubate with rotation at room temperature for 30 min–1 h, or at 4°C with rotation for 1–2 h, to allow the antibody–antigen complex to bind efficiently to the beads.
3.2 Pre-form the bead–antibody complex, then add the cell lysate: Dilute the primary antibody in cell lysis buffer at the dilution ratio recommended in the antibody instruction manual to prepare the antibody working solution. Add an appropriate amount of pre-washed magnetic beads to the antibody working solution and incubate with rotation at room temperature for 15 min, or at 4°C with rotation for 1 h, to form the bead–antibody complex.
Recover the beads by magnetic separation or centrifugation, discard the supernatant, and pre-wash the beads 2–3 times with 1× TBS. Then add the cell lysate and incubate with rotation at 4°C overnight (recommended), or at room temperature with rotation for 2 h.
Washing of the Precipitate and Sample Elution
1. Once immunoprecipitation is complete, separate the beads according to their type and discard the supernatant.
Magnetic beads are separated using a magnetic stand.
For agarose beads, low-speed centrifugation (500–1000 rpm) appropriate for the bead specifications should be used, to avoid bead compaction or damage caused by high-speed centrifugation.
2. Washing the beads: Gently wash the beads 3–5 times with ice-cold 1× cell lysis buffer or 1× TBS/TBST. Keep the temperature low throughout the washes. After each addition of wash buffer, mix gently to fully resuspend the beads; then separate the beads using a magnetic stand or appropriate centrifugation, depending on the bead type, and remove the wash buffer thoroughly to minimize unbound and non-specifically bound components. During each wash, remove as much supernatant as possible while avoiding aspiration of the beads. After the final wash, remove residual wash buffer as completely as possible to prevent dilution of the eluate or interference with downstream analyses. Keep the samples on ice after each wash.
3. Sample elution (choose one of the following):
3.1 Denaturing direct elution (most commonly used): Add SDS sample loading buffer to the bead pellet to a final concentration of 1×. If 3× or 4× SDS sample loading buffer is used, it must first be diluted to 1×. Mix well and heat at 95–100°C for 5 minutes. Separate the beads and collect the supernatant for subsequent electrophoresis.
3.2 Chemical / non-denaturing elution (preserves protein activity): After the final wash, separate the beads using a magnetic stand or low-speed centrifugation, depending on the bead type, and remove residual wash buffer as completely as possible to prevent dilution of the eluate. Add an appropriate amount of acidic elution buffer / high-salt elution buffer to the beads and resuspend them thoroughly. Mix gently and incubate briefly at room temperature to allow the immunocomplex to dissociate from the beads. Separate the beads with a magnetic stand or low-speed centrifugation, and transfer the eluate to a collection tube pre-filled with an appropriate amount of neutralization buffer; adjust the pH if necessary. To improve recovery, elution may be repeated and the eluates pooled. The composition and volume of the elution buffer and neutralization buffer should be determined according to the instructions for the beads and kit used.
3.3 Post-elution sample handling
For protein activity assays, native protein complex analysis, or other non-denaturing analyses: do not add SDS sample loading buffer; keep the sample on ice and proceed to the subsequent experiment as quickly as possible.
For SDS-PAGE or Western blot: add SDS sample loading buffer to the neutralized or desalted eluate to a final concentration of 1×, and then process the sample according to the subsequent electrophoresis requirements.
Select appropriate storage conditions according to the stability of the target protein and the requirements of downstream experiments, and avoid repeated freeze–thaw cycles.
Downstream Analysis
Western blot analysis: Take the supernatant and perform SDS-PAGE electrophoresis followed by membrane transfer. It is recommended to use light- and heavy-chain-specific or conformation-specific secondary antibodies to avoid interference of the immunoglobulin heavy/light chain bands (50 kDa / 25 kDa) with detection of the target protein. It is recommended to include Input, isotype control IgG-IP, and target antibody-IP samples on the same Western blot; if necessary, a beads-only control may also be added to evaluate immunoprecipitation efficiency and non-specific binding. Kinase activity assay (if applicable): skip the denaturation step, wash the beads with kinase buffer, then add substrate and ATP directly to perform the kinase reaction.
Note: All lysis and immunoprecipitation procedures should be performed at 4°C or on ice to preserve the native conformation of proteins as much as possible and prevent their degradation. |
| WB |
Experimental Protocol:
Sample preparation
1. Tissue: Lyse the tissue sample by adding an appropriate volume of ice-cold RIPA/NP-40 Lysis Buffer (containing Protease Inhibitor Cocktail),and homogenize the tissue at a low temperature or lyse it by sonication on ice, then incubate on ice for 30 minutes. 2. Adherent cell: Aspirate the culture medium and wash the cells with ice-cold PBS twice. Lyse the cells by adding an appropriate volume of RIPA/NP-40 Lysis Buffer (containing Protease Inhibitor Cocktail) , sonicate to lyse the cells, and incubate on ice for 30 minutes. 3. Suspension cell: Transfer the culture medium to a pre-cooled centrifuge tube. Centrifuge and aspirate the supernatant. Wash the cells with ice-cold PBS twice. Lyse the cells by adding an appropriate volume of RIPA/NP-40 Lysis Buffer (containing Protease Inhibitor Cocktail) , sonicate to lyse the cells, and incubate on ice for 30 minutes. 4. Place the lysate into a pre-cooled microcentrifuge tube. Centrifuge at 4°C for 15 min. Collect the supernatant;
5. Remove a small volume of lysate to determine the protein concentration;
6. Combine the lysate with protein loading buffer. Boil 20 µL sample under 95-100°C for 5 min. Centrifuge for 5 min after cool down on ice.
Electrophoretic separation
1. According to the concentration of extracted protein, load appropriate amount of protein sample and marker onto SDS-PAGE gels for electrophoresis. Recommended separating gel (lower gel) concentration: 10%. Reference Table for Selecting SDS-PAGE Separation Gel Concentrations 2. Power up 80V for 30 minutes. Then the power supply is adjusted (110 V~150 V), the Marker is observed, and the electrophoresis can be stopped when the indicator band of the predyed protein Marker where the protein is located is properly separated. (Note that the current should not be too large when electrophoresis, too large current (more than 150 mA) will cause the temperature to rise, affecting the result of running glue. If high currents cannot be avoided, an ice bath can be used to cool the bath.)
Transfer membrane
1. Take out the converter, soak the clip and consumables in the pre-cooled converter;
2. Activate PVDF membrane with methanol for 1 min and rinse with transfer buffer;
3. Install it in the order of "black edge of clip - sponge - filter paper - filter paper - glue -PVDF membrane - filter paper - filter paper - sponge - white edge of clip"; 4. The protein was electrotransferred to PVDF membrane. ( 0.45 µm PVDF membrane is recommended ) Reference Table for Selecting PVDF Membrane Pore Size Specifications Recommended conditions for wet transfer: 200 mA, 120 min. ( Note that the transfer conditions can be adjusted according to the protein size. For high-molecular-weight proteins, a higher current and longer transfer time are recommended. However, ensure that the transfer tank remains at a low temperature to prevent gel melting.)
Block
1. After electrotransfer, wash the film with TBST at room temperature for 5 minutes;
2. Incubate the film in the blocking solution for 1 hour at room temperature;
3. Wash the film with TBST for 3 times, 5 minutes each time.
Antibody incubation
1. Use primary antibody dilution buffer to prepare the primary antibody working liquid (recommended dilution ratio for primary antibody 1:500), gently shake and incubate with the film at 4°C overnight; 2. Wash the film with TBST 3 times, 5 minutes each time;
3. Add the secondary antibody to the blocking solution and incubate with the film gently at room temperature for 1 hour;
4. After incubation, wash the film with TBST 3 times for 5 minutes each time.
Antibody staining
1. Add the prepared ECL luminescent substrate (or select other color developing substrate according to the second antibody) and mix evenly;
2. Incubate with the film for 1 minute, remove excess substrate (keep the film moist), wrap with plastic film, and expose in the imaging system.
|
References
|
Application Data
WB
Validated by Selleck
-
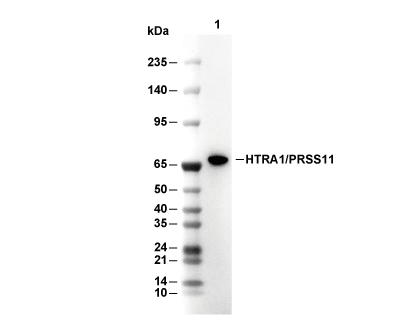 Lane 1: Recombinant Human HTRA1 Protein(His & SUMO)