
|
How to Cite 1. For In-Text Citation (Materials & Methods): 2. For Key Resources Table: |
||
|
Toll Free: (877) 796-6397 -- USA and Canada only -- |
Fax: +1-832-582-8590 Orders: +1-832-582-8158 |
Tech Support: +1-832-582-8158 Ext:3 Please provide your Order Number in the email. We strive to reply to |
Biological Description
| Specificity | HEPACAM Antibody (Rabbit mAb) [E11A10] detects endogenous levels of total HEPACAM protein. |
|---|---|
| Background | HEPACAM, also known as GlialCAM, is an immunoglobulin-like cell adhesion molecule enriched in glial cells that functions at the interface of cell–cell and cell–matrix contacts to organize glial architecture and signaling within neural and other tissues. The protein carries extracellular Ig-like domains, a single transmembrane segment and a cytoplasmic tail that is glycosylated and phosphorylated and capable of forming cis homodimers at the cell surface, a structural arrangement that supports both lateral clustering at cell–cell junctions and positioning along cell protrusions and basal membranes where it engages extracellular matrix components. Through its intact extracellular and cytoplasmic domains, HEPACAM promotes spreading on fibronectin and matrigel, delays detachment and enhances wound closure, indicating a direct role in modulating actin-dependent cell–matrix adhesion and motility; deletion of the cytoplasmic tail reduces these effects, underscoring the importance of cytoplasmic coupling for transmitting adhesive cues to the cytoskeleton. Direct interaction with F‑actin and co-localization with junctional molecules such as E‑cadherin link HEPACAM to cortical actin networks and epithelial or glial junctional complexes, providing a scaffold that connects surface adhesion with intracellular structural organization and growth control. In astrocytes, HEPACAM associates with connexin 43 and stabilizes its localization at plasma membrane junctions, increasing connexin 43 protein levels by limiting lysosomal degradation and thereby supporting robust gap‑junction coupling between glial cells. Loss or mutation of HEPACAM disrupts this association, accelerates connexin 43 turnover and impairs gap‑junction communication, which leads to defects in astrocyte tiling, reduced astrocyte morphological complexity and altered inhibitory synapse density and miniature inhibitory postsynaptic current amplitude, linking HEPACAM-dependent junctional organization to the balance of synaptic excitation and inhibition in cortical circuits. During development, astrocyte-enriched HEPACAM participates in transcellular and cell–ECM interactions that shape astrocyte territories within the neuropil and regulate how processes ensheath synapses, making its expression level a determinant of astrocyte morphogenesis and territory formation. In glioblastoma models, re-expression of HEPACAM in tumor cells induces differentiation characterized by increased glial fibrillary acidic protein, altered cell-cycle regulator profiles, reduced proliferation and migration, and enhanced adhesion, supporting a tumor-suppressive role that shifts cells from an invasive, self-renewing state toward a more differentiated, less motile phenotype. Genetically targeting HEPACAM in glioblastoma stem-like cells promotes a transition from proliferation to invasion accompanied by activation of focal adhesion signaling and stronger adhesion to brain extracellular matrix, indicating that the HEPACAM pathway balances ECM adhesion and intracellular signaling to control the trade-off between growth and dispersal within the brain parenchyma. Germline mutations in HEPACAM are linked to megalencephalic leukoencephalopathy with subcortical cysts, where defective GlialCAM fails to properly traffic MLC1 and ClC‑2 to astrocytic junctions and likely disturbs glial communication and white matter integrity, connecting its junctional transport function with leukodystrophy pathogenesis. |
Usage Information
| Application | WB, IHC | Dilution |
|
||||
|---|---|---|---|---|---|---|---|
| Reactivity | Rat, Mouse, Human | ||||||
| Source | Rabbit Monoclonal Antibody | MW | 46 kDa | ||||
| Storage Buffer | PBS, pH 7.2+50% Glycerol+0.05% BSA+0.01% NaN3 | Storage (from the date of receipt) |
-20°C (avoid freeze-thaw cycles), 2 years | ||||
| WB |
Experimental Protocol:
Sample preparation
1. Tissue: Lyse the tissue sample by adding an appropriate volume of ice-cold RIPA/NP-40 Lysis Buffer (containing Protease Inhibitor Cocktail),and homogenize the tissue at a low temperature or lyse it by sonication on ice, then incubate on ice for 30 minutes. 2. Adherent cell: Aspirate the culture medium and wash the cells with ice-cold PBS twice. Lyse the cells by adding an appropriate volume of RIPA/NP-40 Lysis Buffer (containing Protease Inhibitor Cocktail) , sonicate to lyse the cells, and incubate on ice for 30 minutes. 3. Suspension cell: Transfer the culture medium to a pre-cooled centrifuge tube. Centrifuge and aspirate the supernatant. Wash the cells with ice-cold PBS twice. Lyse the cells by adding an appropriate volume of RIPA/NP-40 Lysis Buffer (containing Protease Inhibitor Cocktail) , sonicate to lyse the cells, and incubate on ice for 30 minutes. 4. Place the lysate into a pre-cooled microcentrifuge tube. Centrifuge at 4°C for 15 min. Collect the supernatant;
5. Remove a small volume of lysate to determine the protein concentration;
6. Combine the lysate with protein loading buffer. Boil 20 µL sample under 95-100°C for 5 min. Centrifuge for 5 min after cool down on ice.
Electrophoretic separation
1. According to the concentration of extracted protein, load appropriate amount of protein sample and marker onto SDS-PAGE gels for electrophoresis. Recommended separating gel (lower gel) concentration: 10%. Reference Table for Selecting SDS-PAGE Separation Gel Concentrations 2. Power up 80V for 30 minutes. Then the power supply is adjusted (110 V~150 V), the Marker is observed, and the electrophoresis can be stopped when the indicator band of the predyed protein Marker where the protein is located is properly separated. (Note that the current should not be too large when electrophoresis, too large current (more than 150 mA) will cause the temperature to rise, affecting the result of running glue. If high currents cannot be avoided, an ice bath can be used to cool the bath.)
Transfer membrane
1. Take out the converter, soak the clip and consumables in the pre-cooled converter;
2. Activate PVDF membrane with methanol for 1 min and rinse with transfer buffer;
3. Install it in the order of "black edge of clip - sponge - filter paper - filter paper - glue -PVDF membrane - filter paper - filter paper - sponge - white edge of clip"; 4. The protein was electrotransferred to PVDF membrane. ( 0.45 µm PVDF membrane is recommended ) Reference Table for Selecting PVDF Membrane Pore Size Specifications Recommended conditions for wet transfer: 200 mA, 120 min. ( Note that the transfer conditions can be adjusted according to the protein size. For high-molecular-weight proteins, a higher current and longer transfer time are recommended. However, ensure that the transfer tank remains at a low temperature to prevent gel melting.)
Block
1. After electrotransfer, wash the film with TBST at room temperature for 5 minutes;
2. Incubate the film in the blocking solution for 1 hour at room temperature;
3. Wash the film with TBST for 3 times, 5 minutes each time.
Antibody incubation
1. Use primary antibody dilution buffer to prepare the primary antibody working liquid (recommended dilution ratio for primary antibody 1:2000), gently shake and incubate with the film at 4°C overnight; 2. Wash the film with TBST 3 times, 5 minutes each time;
3. Add the secondary antibody to the blocking solution and incubate with the film gently at room temperature for 1 hour;
4. After incubation, wash the film with TBST 3 times for 5 minutes each time.
Antibody staining
1. Add the prepared ECL luminescent substrate (or select other color developing substrate according to the second antibody) and mix evenly;
2. Incubate with the film for 1 minute, remove excess substrate (keep the film moist), wrap with plastic film, and expose in the imaging system. (Exposure time of at least 90s is recommended)
|
| IHC |
Experimental Protocol:
Deparaffinization/Rehydration
1. Deparaffinize/hydrate sections:
2. Incubate sections in three washes of xylene for 5 min each.
3. Incubate sections in two washes of 100% ethanol for 10 min each.
4. Incubate sections in two washes of 95% ethanol for 10 min each.
5. Wash sections two times in dH2O for 5 min each.
6.Antigen retrieval: For Citrate: Heat slides in a microwave submersed in 1X citrate unmasking solution until boiling is initiated; continue with 10 min at a sub-boiling temperature (95°-98°C). Cool slides on bench top for 30 min.
Staining
1. Wash sections in dH2O three times for 5 min each.
2. Incubate sections in 3% hydrogen peroxide for 10 min.
3. Wash sections in dH2O two times for 5 min each.
4. Wash sections in wash buffer for 5 min.
5. Block each section with 100–400 µl of blocking solution for 1 hr at room temperature.
6. Remove blocking solution and add 100–400 µl primary antibody diluent in to each section. Incubate overnight at 4°C.
7. Remove antibody solution and wash sections with wash buffer three times for 5 min each.
8. Cover section with 1–3 drops HRPas needed. Incubate in a humidified chamber for 30 min at room temperature.
9. Wash sections three times with wash buffer for 5 min each.
10. Add DAB Chromogen Concentrate to DAB Diluent and mix well before use.
11. Apply 100–400 µl DAB to each section and monitor closely. 1–10 min generally provides an acceptable staining intensity.
12. Immerse slides in dH2O.
13. If desired, counterstain sections with hematoxylin.
14. Wash sections in dH2O two times for 5 min each.
15. Dehydrate sections: Incubate sections in 95% ethanol two times for 10 sec each; Repeat in 100% ethanol, incubating sections two times for 10 sec each; Repeat in xylene, incubating sections two times for 10 sec each.
16. Mount sections with coverslips and mounting medium.
|
References
|
Application Data
WB
Validated by Selleck
-
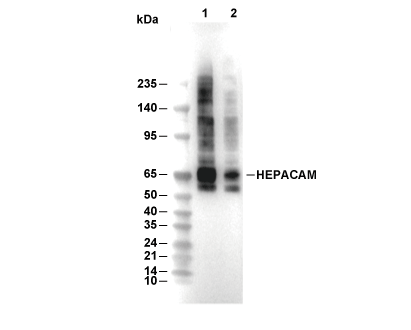 Lane 1: Mouse brain, Lane 2: Rat brain