
|
How to Cite 1. For In-Text Citation (Materials & Methods): 2. For Key Resources Table: |
||
|
Toll Free: (877) 796-6397 -- USA and Canada only -- |
Fax: +1-832-582-8590 Orders: +1-832-582-8158 |
Tech Support: +1-832-582-8158 Ext:3 Please provide your Order Number in the email. We strive to reply to |
Biological Description
| Specificity | CUL3 Antibody (Rabbit mAb) [N12N7] detects endogenous levels of total CUL3 protein. |
|---|---|
| Background | CUL3 (Cullin-3) belongs to the cullin family of scaffold proteins that assemble Cullin-RING ubiquitin ligase (CRL) complexes, the largest class of E3 ligases in eukaryotic cells, and CUL3 forms one of eight distinct cullin-based assemblies distinguished by their substrate-recognition modules. CUL3 anchors the RING-finger catalytic protein Rbx1 at its C-terminus, positioning the ubiquitin-charged E2 conjugating enzyme for substrate transfer, while its N-terminal domain binds directly to BTB (Bric-a-brac/Tramtrack/Broad complex) domain-containing adaptor proteins that simultaneously serve as substrate receptors, a modular arrangement that removes the need for a separate linker subunit and distinguishes CUL3 complexes from other cullin-RING assemblies. BTB adaptors combine their conserved Cul3-binding domain with a second, variable domain such as Kelch, MATH, zinc finger, or PHR that dictates substrate specificity, and this combinatorial pairing allows CUL3 to organize a large repertoire of distinct ubiquitin ligase complexes from a single scaffold. BTB adaptors are also capable of dimerization, allowing two CUL3 molecules to be incorporated into a single ligase complex, a configuration linked to substrate ubiquitination efficiency. Ligase activation depends on conjugation of the ubiquitin-like protein Nedd8 onto a conserved C-terminal lysine of CUL3, which reshapes the Rbx1 RING domain and increases its conformational flexibility, bringing the E2 enzyme into proximity with the substrate for efficient ubiquitin transfer. Through this mechanism, CUL3 complexes direct proteasomal degradation of substrates governing cell cycle progression, transcriptional regulation, and developmental differentiation. Among characterized CUL3-BTB pairings, Keap1 links CUL3 to Nrf2, controlling the oxidative stress response, KLHL20 bridges CUL3 to substrates including PML and DAPK, influencing tumor suppressor turnover, and SPOP directs CUL3 activity toward substrates involved in transcriptional and signaling regulation, and dysregulation of these adaptor-substrate relationships is observed across multiple human cancers, altering ligase output and stabilizing or depleting proteins that shape tumor progression and therapeutic response. The single-adaptor bridging design, combined with tissue-specific expression of individual BTB proteins, makes CUL3 ligase complexes a tractable framework for dissecting selective protein degradation pathways and for identifying which adaptor-substrate module underlies a particular physiological or disease phenotype, information that is directly relevant when researchers are selecting CUL3-associated targets for functional or therapeutic study. |
Usage Information
| Application | WB, IP | Dilution |
|
||||
|---|---|---|---|---|---|---|---|
| Reactivity | Human, Mouse, Rat, Monkey | ||||||
| Source | Rabbit Monoclonal Antibody | MW | 89 kDa | ||||
| Storage Buffer | PBS, pH 7.2+50% Glycerol+0.05% BSA+0.01% NaN3 | Storage (from the date of receipt) |
-20°C (avoid freeze-thaw cycles), 2 years | ||||
| WB |
Experimental Protocol:
Sample preparation
1. Tissue: Lyse the tissue sample by adding an appropriate volume of ice-cold RIPA/NP-40 Lysis Buffer (containing Protease Inhibitor Cocktail),and homogenize the tissue at a low temperature or lyse it by sonication on ice, then incubate on ice for 30 minutes. 2. Adherent cell: Aspirate the culture medium and wash the cells with ice-cold PBS twice. Lyse the cells by adding an appropriate volume of RIPA/NP-40 Lysis Buffer (containing Protease Inhibitor Cocktail) , sonicate to lyse the cells, and incubate on ice for 30 minutes. 3. Suspension cell: Transfer the culture medium to a pre-cooled centrifuge tube. Centrifuge and aspirate the supernatant. Wash the cells with ice-cold PBS twice. Lyse the cells by adding an appropriate volume of RIPA/NP-40 Lysis Buffer (containing Protease Inhibitor Cocktail) , sonicate to lyse the cells, and incubate on ice for 30 minutes. 4. Place the lysate into a pre-cooled microcentrifuge tube. Centrifuge at 4°C for 15 min. Collect the supernatant;
5. Remove a small volume of lysate to determine the protein concentration;
6. Combine the lysate with protein loading buffer. Boil 20 µL sample under 95-100°C for 5 min. Centrifuge for 5 min after cool down on ice.
Electrophoretic separation
1. According to the concentration of extracted protein, load appropriate amount of protein sample and marker onto SDS-PAGE gels for electrophoresis. Recommended separating gel (lower gel) concentration: 10%. Reference Table for Selecting SDS-PAGE Separation Gel Concentrations 2. Power up 80V for 30 minutes. Then the power supply is adjusted (110 V~150 V), the Marker is observed, and the electrophoresis can be stopped when the indicator band of the predyed protein Marker where the protein is located is properly separated. (Note that the current should not be too large when electrophoresis, too large current (more than 150 mA) will cause the temperature to rise, affecting the result of running glue. If high currents cannot be avoided, an ice bath can be used to cool the bath.)
Transfer membrane
1. Take out the converter, soak the clip and consumables in the pre-cooled converter;
2. Activate PVDF membrane with methanol for 1 min and rinse with transfer buffer;
3. Install it in the order of "black edge of clip - sponge - filter paper - filter paper - glue -PVDF membrane - filter paper - filter paper - sponge - white edge of clip"; 4. The protein was electrotransferred to PVDF membrane. ( 0.45 µm PVDF membrane is recommended ) Reference Table for Selecting PVDF Membrane Pore Size Specifications Recommended conditions for wet transfer: 200 mA, 120 min. ( Note that the transfer conditions can be adjusted according to the protein size. For high-molecular-weight proteins, a higher current and longer transfer time are recommended. However, ensure that the transfer tank remains at a low temperature to prevent gel melting.)
Block
1. After electrotransfer, wash the film with TBST at room temperature for 5 minutes;
2. Incubate the film in the blocking solution for 1 hour at room temperature;
3. Wash the film with TBST for 3 times, 5 minutes each time.
Antibody incubation
1. Use primary antibody dilution buffer to prepare the primary antibody working liquid (recommended dilution ratio for primary antibody 1:1000), gently shake and incubate with the film at 4°C overnight; 2. Wash the film with TBST 3 times, 5 minutes each time;
3. Add the secondary antibody to the blocking solution and incubate with the film gently at room temperature for 1 hour;
4. After incubation, wash the film with TBST 3 times for 5 minutes each time.
Antibody staining
1. Add the prepared ECL luminescent substrate (or select other color developing substrate according to the second antibody) and mix evenly;
2. Incubate with the film for 1 minute, remove excess substrate (keep the film moist), wrap with plastic film, and expose in the imaging system.
|
References
|
Application Data
WB
Validated by Selleck
-
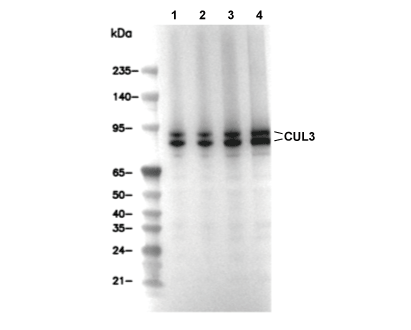 Lane 1: A204, Lane 2: A673, Lane 3: Neuro-2a, Lane 4: COS-7