
|
How to Cite 1. For In-Text Citation (Materials & Methods): 2. For Key Resources Table: |
||
|
Toll Free: (877) 796-6397 -- USA and Canada only -- |
Fax: +1-832-582-8590 Orders: +1-832-582-8158 |
Tech Support: +1-832-582-8158 Ext:3 Please provide your Order Number in the email. We strive to reply to |
Biological Description
| Specificity | CD3 ζ Antibody (Armenian hamster mAb) [N1P1] detects endogenous levels of total CD3 ζ protein. |
|---|---|
| Background | CD3ζ, encoded by CD247, functions as the principal signal-transducing subunit of the T-cell receptor–CD3 complex and pairs as a disulfide-linked homodimer with the antigen-binding TCRαβ heterodimer and the CD3γε and CD3δε dimers on the T-lymphocyte surface. A short extracellular segment and a transmembrane domain carrying a negatively charged residue anchor the chain within this receptor assembly. A long cytoplasmic tail contains three immunoreceptor tyrosine-based activation motifs, in contrast to the single-ITAM cytoplasmic domains of CD3γ, CD3δ and CD3ε, giving the ζζ homodimer six tyrosine-phosphorylation sites within one signaling module. Antigen engagement of the TCR triggers phosphorylation of these ITAM tyrosines by the Src-family kinases Lck and Fyn. The resulting phosphotyrosine pairs create docking sites that recruit ZAP-70 through its tandem SH2 domains, converting ZAP-70 into a catalytically active kinase. Activated ZAP-70 propagates signal transmission toward downstream calcium mobilization, Ras-MAPK activation, and the transcriptional programs governing T-cell activation and cytokine production. The CD3 subunits together contribute ten ITAMs, three from each ζ chain and one from each of the remaining CD3 chains, engaged coordinately during receptor triggering. CD3ζ participates in thymic selection during T-cell differentiation and in peripheral T-cell responses. CD3ζ expression and phosphorylation status are linked to the composition of the surrounding receptor complex. In T lymphocytes from patients with systemic lupus erythematosus, CD3ζ is replaced by the structurally related FcRγ chain within the TCR/CD3 complex. This replacement alters the pattern of receptor-proximal tyrosine phosphorylation and redirects downstream kinase recruitment toward Syk in place of ZAP-70. The Syk-associated signaling produces altered calcium responses and altered interleukin-2 output compared with ZAP-70-dependent signaling through intact CD3ζ. |
Usage Information
| Application | WB, IP, IF, FCM | Dilution |
|
||
|---|---|---|---|---|---|
| Reactivity | Mouse, Human | ||||
| Source | Armenian hamster Monoclonal Antibody | MW | 19 kDa | ||
| Storage Buffer | PBS, pH 7.2+50% Glycerol+0.05% BSA+0.01% NaN3 | Storage (from the date of receipt) |
-20°C (avoid freeze-thaw cycles), 2 years | ||
| WB |
Experimental Protocol:
Sample preparation
1. Tissue: Lyse the tissue sample by adding an appropriate volume of ice-cold RIPA/NP-40 Lysis Buffer (containing Protease Inhibitor Cocktail),and homogenize the tissue at a low temperature or lyse it by sonication on ice, then incubate on ice for 30 minutes. 2. Adherent cell: Aspirate the culture medium and wash the cells with ice-cold PBS twice. Lyse the cells by adding an appropriate volume of RIPA/NP-40 Lysis Buffer (containing Protease Inhibitor Cocktail) , sonicate to lyse the cells, and incubate on ice for 30 minutes. 3. Suspension cell: Transfer the culture medium to a pre-cooled centrifuge tube. Centrifuge and aspirate the supernatant. Wash the cells with ice-cold PBS twice. Lyse the cells by adding an appropriate volume of RIPA/NP-40 Lysis Buffer (containing Protease Inhibitor Cocktail) , sonicate to lyse the cells, and incubate on ice for 30 minutes. 4. Place the lysate into a pre-cooled microcentrifuge tube. Centrifuge at 4°C for 15 min. Collect the supernatant;
5. Remove a small volume of lysate to determine the protein concentration;
6. Add protein loading buffer to the 20 μL sample, and keep it on ice for immediate use; or determine the optimal denaturation conditions by boiling the sample at a temperature gradient (e.g., 37°C, 50°C, 70°C, 90°C, and 100°C). Cool the sample on ice and centrifuge for 5 min.
Electrophoretic separation
1. According to the concentration of extracted protein, load appropriate amount of protein sample and marker onto SDS-PAGE gels for electrophoresis. Recommended separating gel (lower gel) concentration: 10%. Reference Table for Selecting SDS-PAGE Separation Gel Concentrations 2. Power up 80V for 30 minutes. Then the power supply is adjusted (110 V~150 V), the Marker is observed, and the electrophoresis can be stopped when the indicator band of the predyed protein Marker where the protein is located is properly separated. (Note that the current should not be too large when electrophoresis, too large current (more than 150 mA) will cause the temperature to rise, affecting the result of running glue. If high currents cannot be avoided, an ice bath can be used to cool the bath.)
Transfer membrane
1. Take out the converter, soak the clip and consumables in the pre-cooled converter;
2. Activate PVDF membrane with methanol for 1 min and rinse with transfer buffer;
3. Install it in the order of "black edge of clip - sponge - filter paper - filter paper - glue -PVDF membrane - filter paper - filter paper - sponge - white edge of clip"; 4. The protein was electrotransferred to PVDF membrane. ( 0.22 µm PVDF membrane is recommended )) Reference Table for Selecting PVDF Membrane Pore Size Specifications Recommended conditions for wet transfer: 200 mA, 60 min. ( Note that the transfer conditions can be adjusted according to the protein size. For high-molecular-weight proteins, a higher current and longer transfer time are recommended. However, ensure that the transfer tank remains at a low temperature to prevent gel melting.)
Block
1. After electrotransfer, wash the film with TBST at room temperature for 5 minutes;
2. Incubate the film in the blocking solution for 1 hour at room temperature;
3. Wash the film with TBST for 3 times, 5 minutes each time.
Antibody incubation
1. Use primary antibody dilution buffer to prepare the primary antibody working liquid (recommended dilution ratio for primary antibody 1:500), gently shake and incubate with the film at 4°C overnight; 2. Wash the film with TBST 3 times, 5 minutes each time;
3. Add the secondary antibody to the blocking solution and incubate with the film gently at room temperature for 1 hour;
4. After incubation, wash the film with TBST 3 times for 5 minutes each time.
Antibody staining
1. Add the prepared ECL luminescent substrate (or select other color developing substrate according to the second antibody) and mix evenly;
2. Incubate with the film for 1 minute, remove excess substrate (keep the film moist), wrap with plastic film, and expose in the imaging system.
|
| IF |
Experimental Protocol:
Sample Preparation
1. Adherent Cells: Place a clean, sterile coverslip in a culture dish. Once the cells grow to near confluence as a monolayer, remove the coverslip for further use.
2. Suspension Cells: Seed the cells onto a clean, sterile slide coated with poly-L-lysine.
3. Frozen Sections: Allow the slide to thaw at room temperature. Wash it with pure water or PBS for 2 times, 3 minutes each time.
4. Paraffin Sections: Deparaffinization and rehydration. Wash the slide with pure water or PBS for 3 times, 3 minutes each time. Then perform antigen retrieval.
Fixation
1. Fix the cell coverslips/spots or tissue sections at room temperature using a fixative such as 4% paraformaldehyde (4% PFA) for 10-15 minutes.
2. Wash the sample with PBS for 3 times, 3 minutes each time.
Blocking
Add blocking solution and incubate at room temperature for at least 1 hour. (Common blocking solutions include: serum from the same source as the secondary antibody, BSA, or goat serum.)
Note: Ensure the sample remains moist during and after the blocking step to prevent drying, which can lead to high background.
Immunofluorescence Staining (Day 1)
1. Remove the blocking solution and add the diluted primary antibody.
2. Incubate the sample in a humidified chamber at 4°C overnight.
Immunofluorescence Staining (Day 2)
1. Remove the primary antibody and wash with PBST for 3 times, 5 minutes each time.
2. Add the diluted fluorescent secondary antibody and incubate in the dark at 4°C for 1–2 hours.
3. Remove the secondary antibody and wash with PBST for 3 times, 5 minutes each time.
4. Add diluted DAPI and incubate at room temperature in the dark for 5–10 minutes.
5. Wash with PBST for 3 times, 5 minutes each time.
Mounting
1. Mount the sample with an anti-fade mounting medium.
2. Allow the slide to dry at room temperature overnight in the dark.
3. Store the slide in a slide storage box at 4°C, protected from light.
|
References
|
Application Data
WB
Validated by Selleck
-
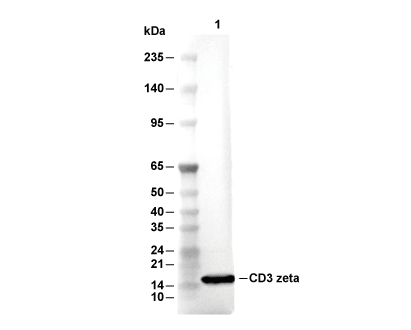 Lane 1: Murine Splenocytes