
|
How to Cite 1. For In-Text Citation (Materials & Methods): 2. For Key Resources Table: |
||
|
Toll Free: (877) 796-6397 -- USA and Canada only -- |
Fax: +1-832-582-8590 Orders: +1-832-582-8158 |
Tech Support: +1-832-582-8158 Ext:3 Please provide your Order Number in the email. We strive to reply to |
Biological Description
| Specificity | CCL5/RANTES Antibody (Mouse mAb) [K11A8] detects endogenous levels of total CCL5/RANTES protein. |
|---|---|
| Background | CCL5, originally named RANTES for Regulated upon Activation, Normal T cell Expressed and presumably Secreted, belongs to the CC subfamily of chemokines and signals through three G-protein-coupled receptors, CCR1, CCR3, and CCR5, with CCR5 representing its primary and most extensively characterized receptor partner. CCL5 assembles from a canonical CC-chemokine dimer into higher-order, rod-shaped double-helical oligomers through a polymerization mechanism, and this oligomerization is coupled to binding of glycosaminoglycans on cell surfaces and in the extracellular matrix, with a positively charged, fully exposed KKWVR motif mediating the GAG interaction distinct from the buried BBXB motifs used by related chemokines such as CCL3. Mutations that disrupt key residues involved in dimer-dimer contacts, including E66 and E26, produce a disaggregating effect on CCL5 oligomers, directly linking specific charged residues to the higher-order assembly process rather than to receptor engagement itself. This oligomerization and GAG-binding activity is functionally required rather than incidental: CCR1-mediated arrest of leukocytes on inflamed endothelium depends specifically on CCL5 oligomerization, whereas CCR5-mediated transmigration of leukocytes proceeds independently of oligomer formation, showing that the two receptors engage functionally distinct forms of the chemokine to produce different steps of the leukocyte adhesion cascade. Receptor engagement by CCL5 induces a conformational change in CCR5 that activates heterotrimeric G-protein subunits, triggering changes in cyclic AMP, inositol triphosphate, and intracellular calcium alongside tyrosine kinase activation, and these signaling events drive cell polarization and translocation of NF-κB, increasing phagocytic capacity, cell survival, and transcription of proinflammatory genes. CCL5 also forms heterooligomers with other chemokines such as CXCL4, particularly when CXCL4 is present in excess following platelet activation, and this heterooligomer complex alters the surface charge distribution of the assembly, allowing tighter GAG binding than CCL5 oligomers formed alone, extending CCL5's functional repertoire beyond homotypic self-assembly. In the tumor microenvironment, CCL5-CCR5 signaling recruits regulatory T cells and myeloid-derived suppressor cells, polarizes tumor-associated macrophages, supports epithelial-mesenchymal transition, and stabilizes PD-L1 expression, connecting the same oligomerization- and GAG-dependent mechanisms established in inflammatory contexts to protumorigenic processes and therapeutic resistance. CCL5 additionally contributes to fibrosis progression through CCR1 and CCR5 signaling in experimental liver injury models, where receptor antagonism ameliorates fibrotic scarring, underscoring the CCL5-CCR1/CCR5 axis as a defined target across inflammatory, fibrotic, and oncological disease contexts. |
Usage Information
| Application | WB, IHC, FCM | Dilution |
|
||||||
|---|---|---|---|---|---|---|---|---|---|
| Reactivity | Human | ||||||||
| Source | Mouse Monoclonal Antibody | MW | 10 kDa | ||||||
| Storage Buffer | PBS, pH 7.2+50% Glycerol+0.05% BSA+0.01% NaN3 | Storage (from the date of receipt) |
-20°C (avoid freeze-thaw cycles), 2 years | ||||||
| WB |
Experimental Protocol:
Sample preparation
1. Tissue: Lyse the tissue sample by adding an appropriate volume of ice-cold RIPA/Nuclear Lysis Buffer (containing Protease Inhibitor Cocktail),and homogenize the tissue at a low temperature or lyse it by sonication on ice, then incubate on ice for 30 minutes. 2. Adherent cell: Aspirate the culture medium and wash the cells with ice-cold PBS twice. Lyse the cells by adding an appropriate volume of RIPA/Nuclear Lysis Buffer (containing Protease Inhibitor Cocktail) , sonicate to lyse the cells, and incubate on ice for 30 minutes. 3. Suspension cell: Transfer the culture medium to a pre-cooled centrifuge tube. Centrifuge and aspirate the supernatant. Wash the cells with ice-cold PBS twice. Lyse the cells by adding an appropriate volume of RIPA/Nuclear Lysis Buffer (containing Protease Inhibitor Cocktail) , sonicate to lyse the cells, and incubate on ice for 30 minutes. 4. Place the lysate into a pre-cooled microcentrifuge tube. Centrifuge at 4°C for 15 min. Collect the supernatant;
5. Remove a small volume of lysate to determine the protein concentration;
6. Combine the lysate with protein loading buffer. Boil 20 µL sample under 95-100°C for 5 min. Centrifuge for 5 min after cool down on ice.
Electrophoretic separation
1. According to the concentration of extracted protein, load appropriate amount of protein sample and marker onto SDS-PAGE gels for electrophoresis. Recommended separating gel (lower gel) concentration: 20%. Reference Table for Selecting SDS-PAGE Separation Gel Concentrations 2. Power up 80V for 30 minutes. Then the power supply is adjusted (110 V~150 V), the Marker is observed, and the electrophoresis can be stopped when the indicator band of the predyed protein Marker where the protein is located is properly separated. (Note that the current should not be too large when electrophoresis, too large current (more than 150 mA) will cause the temperature to rise, affecting the result of running glue. If high currents cannot be avoided, an ice bath can be used to cool the bath.)
Transfer membrane
1. Take out the converter, soak the clip and consumables in the pre-cooled converter;
2. Activate PVDF membrane with methanol for 1 min and rinse with transfer buffer;
3. Install it in the order of "black edge of clip - sponge - filter paper - filter paper - glue -PVDF membrane - filter paper - filter paper - sponge - white edge of clip"; 4. The protein was electrotransferred to PVDF membrane. ( 0.22 µm PVDF membrane is recommended )) Reference Table for Selecting PVDF Membrane Pore Size Specifications Recommended conditions for wet transfer: 200 mA, 60 min. ( Note that the transfer conditions can be adjusted according to the protein size. For high-molecular-weight proteins, a higher current and longer transfer time are recommended. However, ensure that the transfer tank remains at a low temperature to prevent gel melting.)
Block
1. After electrotransfer, wash the film with TBST at room temperature for 5 minutes;
2. Incubate the film in the blocking solution for 1 hour at room temperature;
3. Wash the film with TBST for 3 times, 5 minutes each time.
Antibody incubation
1. Use primary antibody dilution buffer to prepare the primary antibody working liquid (recommended dilution ratio for primary antibody 1:1000), gently shake and incubate with the film at 4°C overnight; 2. Wash the film with TBST 3 times, 5 minutes each time;
3. Add the secondary antibody to the blocking solution and incubate with the film gently at room temperature for 1 hour;
4. After incubation, wash the film with TBST 3 times for 5 minutes each time.
Antibody staining
1. Add the prepared ECL luminescent substrate (or select other color developing substrate according to the second antibody) and mix evenly;
2. Incubate with the film for 1 minute, remove excess substrate (keep the film moist), wrap with plastic film, and expose in the imaging system.
|
| IHC |
Experimental Protocol:
Deparaffinization/Rehydration
1. Deparaffinize/hydrate sections:
2. Incubate sections in three washes of xylene for 5 min each.
3. Incubate sections in two washes of 100% ethanol for 10 min each.
4. Incubate sections in two washes of 95% ethanol for 10 min each.
5. Wash sections two times in dH2O for 5 min each.
6.Antigen retrieval: For Citrate: Heat slides in a microwave submersed in 1X citrate unmasking solution until boiling is initiated; continue with 10 min at a sub-boiling temperature (95°-98°C). Cool slides on bench top for 30 min.
Staining
1. Wash sections in dH2O three times for 5 min each.
2. Incubate sections in 3% hydrogen peroxide for 10 min.
3. Wash sections in dH2O two times for 5 min each.
4. Wash sections in wash buffer for 5 min.
5. Block each section with 100–400 µl of blocking solution for 1 hr at room temperature.
6. Remove blocking solution and add 100–400 µl primary antibody diluent in to each section. Incubate overnight at 4°C.
7. Remove antibody solution and wash sections with wash buffer three times for 5 min each.
8. Cover section with 1–3 drops HRPas needed. Incubate in a humidified chamber for 30 min at room temperature.
9. Wash sections three times with wash buffer for 5 min each.
10. Add DAB Chromogen Concentrate to DAB Diluent and mix well before use.
11. Apply 100–400 µl DAB to each section and monitor closely. 1–10 min generally provides an acceptable staining intensity.
12. Immerse slides in dH2O.
13. If desired, counterstain sections with hematoxylin.
14. Wash sections in dH2O two times for 5 min each.
15. Dehydrate sections: Incubate sections in 95% ethanol two times for 10 sec each; Repeat in 100% ethanol, incubating sections two times for 10 sec each; Repeat in xylene, incubating sections two times for 10 sec each.
16. Mount sections with coverslips and mounting medium.
|
References
|
Application Data
IHC
Validated by Selleck
-
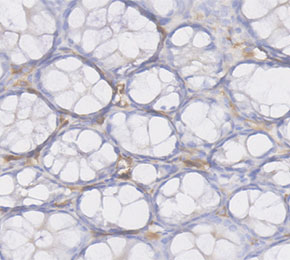 Immunohistochemical analysis of formalin fixed paraffin embedded mouse intestinal tissue with F4576 at 1:20 dilution.