
|
How to Cite 1. For In-Text Citation (Materials & Methods): 2. For Key Resources Table: |
||
|
Toll Free: (877) 796-6397 -- USA and Canada only -- |
Fax: +1-832-582-8590 Orders: +1-832-582-8158 |
Tech Support: +1-832-582-8158 Ext:3 Please provide your Order Number in the email. We strive to reply to |
Biological Description
| Specificity | Calprotectin (S100A8+A9 complex) Antibody (Mouse mAb) [H13D24] detects endogenous levels of total S100A8/S100A9 calprotectin complex. |
|---|---|
| Background | Calprotectin is the heterodimeric complex formed by S100A8 and S100A9, two calcium- and zinc-binding proteins of the S100 family that are among the most abundant cytoplasmic proteins in neutrophils and monocytes, and the complex operates through distinct intracellular and extracellular mechanisms rather than a single unified pathway. Intracellularly, calprotectin facilitates arachidonic acid trafficking within leukocytes and directly promotes assembly of the NADPH-oxidase enzyme complex at the plasma membrane, with S100A8 contributing to this assembly by binding directly to the cytosolic oxidase subunit NCF2/p67phox and by transferring arachidonic acid, an essential cofactor, to the assembling enzyme complex, coupling calprotectin's calcium-sensing function directly to activation of the neutrophil respiratory burst. Once released extracellularly from activated phagocytes, calprotectin functions as an alarmin, engaging the pattern-recognition receptors Toll-like receptor 4 and the receptor for advanced glycation end-products; mechanistic dissection of the TLR4 interaction identifies S100A8 as the specifically active component, which interacts directly with the TLR4-MD2 receptor complex and drives intracellular translocation of the adaptor protein MyD88 together with activation of interleukin-1 receptor-associated kinase-1, culminating in NF-kB activation and elevated tumor necrosis factor-alpha expression. Genetic loss of the S100A8-S100A9 complex protects mice from endotoxin-induced lethal shock and from Escherichia coli-induced abdominal sepsis, directly demonstrating that calprotectin release amplifies rather than merely accompanies the endotoxin-triggered inflammatory response of phagocytes during systemic infection. Beyond TLR4, calprotectin engagement of pattern-recognition receptors activates parallel MAP-kinase signaling that converges on and amplifies the same NF-kB-driven pro-inflammatory cascade, producing recruitment of additional leukocytes and increased cytokine and chemokine output at sites of tissue injury or infection. Calprotectin additionally exerts antimicrobial activity through chelation of zinc, a metal essential for microbial growth, and can trigger cell death in target cells through a pathway linking mitochondrial and lysosomal reactive oxygen species generation to the protein BNIP3, indicating that calprotectin's antimicrobial and apoptosis-inducing functions operate through mechanisms distinct from its TLR4-NF-kB pro-inflammatory signaling. |
Usage Information
| Application | WB, FCM | Dilution |
|
||||||
|---|---|---|---|---|---|---|---|---|---|
| Reactivity | Human | ||||||||
| Source | Mouse Monoclonal Antibody | MW | 13 kDa | ||||||
| Storage Buffer | PBS, pH 7.2+50% Glycerol+0.05% BSA+0.01% NaN3 | Storage (from the date of receipt) |
-20°C (avoid freeze-thaw cycles), 2 years | ||||||
| WB |
Experimental Protocol:
Sample preparation
1. Tissue: Lyse the tissue sample by adding an appropriate volume of ice-cold RIPA/NP-40 Lysis Buffer (containing Protease Inhibitor Cocktail),and homogenize the tissue at a low temperature or lyse it by sonication on ice, then incubate on ice for 30 minutes. 2. Adherent cell: Aspirate the culture medium and wash the cells with ice-cold PBS twice. Lyse the cells by adding an appropriate volume of RIPA/NP-40 Lysis Buffer (containing Protease Inhibitor Cocktail) , sonicate to lyse the cells, and incubate on ice for 30 minutes. 3. Suspension cell: Transfer the culture medium to a pre-cooled centrifuge tube. Centrifuge and aspirate the supernatant. Wash the cells with ice-cold PBS twice. Lyse the cells by adding an appropriate volume of RIPA/NP-40 Lysis Buffer (containing Protease Inhibitor Cocktail) , sonicate to lyse the cells, and incubate on ice for 30 minutes. 4. Place the lysate into a pre-cooled microcentrifuge tube. Centrifuge at 4°C for 15 min. Collect the supernatant;
5. Remove a small volume of lysate to determine the protein concentration;
6. Combine the lysate with protein loading buffer. Boil 20 µL sample under 95-100°C for 5 min. Centrifuge for 5 min after cool down on ice.
Electrophoretic separation
1. According to the concentration of extracted protein, load appropriate amount of protein sample and marker onto SDS-PAGE gels for electrophoresis. Recommended separating gel (lower gel) concentration: 20%. Reference Table for Selecting SDS-PAGE Separation Gel Concentrations 2. Power up 80V for 30 minutes. Then the power supply is adjusted (110 V~150 V), the Marker is observed, and the electrophoresis can be stopped when the indicator band of the predyed protein Marker where the protein is located is properly separated. (Note that the current should not be too large when electrophoresis, too large current (more than 150 mA) will cause the temperature to rise, affecting the result of running glue. If high currents cannot be avoided, an ice bath can be used to cool the bath.)
Transfer membrane
1. Take out the converter, soak the clip and consumables in the pre-cooled converter;
2. Activate PVDF membrane with methanol for 1 min and rinse with transfer buffer;
3. Install it in the order of "black edge of clip - sponge - filter paper - filter paper - glue -PVDF membrane - filter paper - filter paper - sponge - white edge of clip"; 4. The protein was electrotransferred to PVDF membrane. ( 0.22 µm PVDF membrane is recommended )) Reference Table for Selecting PVDF Membrane Pore Size Specifications Recommended conditions for wet transfer: 200 mA, 60 min. ( Note that the transfer conditions can be adjusted according to the protein size. For high-molecular-weight proteins, a higher current and longer transfer time are recommended. However, ensure that the transfer tank remains at a low temperature to prevent gel melting.)
Block
1. After electrotransfer, wash the film with TBST at room temperature for 5 minutes;
2. Incubate the film in the blocking solution for 1 hour at room temperature;
3. Wash the film with TBST for 3 times, 5 minutes each time.
Antibody incubation
1. Use primary antibody dilution buffer to prepare the primary antibody working liquid (recommended dilution ratio for primary antibody 1:100), gently shake and incubate with the film at 4°C overnight; 2. Wash the film with TBST 3 times, 5 minutes each time;
3. Add the secondary antibody to the blocking solution and incubate with the film gently at room temperature for 1 hour;
4. After incubation, wash the film with TBST 3 times for 5 minutes each time.
Antibody staining
1. Add the prepared ECL luminescent substrate (or select other color developing substrate according to the second antibody) and mix evenly;
2. Incubate with the film for 1 minute, remove excess substrate (keep the film moist), wrap with plastic film, and expose in the imaging system.
|
References
|
Application Data
IHC
Validated by Selleck
-
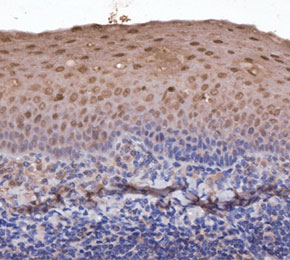 Immunohistochemical analysis of formalin fixed paraffin embedded human tonsils tissue with F2919 at 1:100 dilution.