
|
How to Cite 1. For In-Text Citation (Materials & Methods): 2. For Key Resources Table: |
||
|
Toll Free: (877) 796-6397 -- USA and Canada only -- |
Fax: +1-832-582-8590 Orders: +1-832-582-8158 |
Tech Support: +1-832-582-8158 Ext:3 Please provide your Order Number in the email. We strive to reply to |
Biological Description
| Specificity | ATAD2 Antibody (Rabbit mAb) [B10C17] detects endogenous levels of total ATAD2 proteins. |
|---|---|
| Background | ATAD2 (ATPase family AAA domain-containing protein 2) is a chromatin regulator that combines an AAA+ ATPase domain with a bromodomain, the latter functioning as an epigenetic reader module that binds acetylated lysine residues on histone tails. ATAD2's bromodomain specifically recognizes histone H4 that is di-acetylated at lysines 5 and 12, a transient modification found exclusively on newly synthesized histones deposited onto DNA during replication-coupled nucleosome assembly, and ATAD2 is co-expressed with DNA replication genes and predominantly expressed during S phase, where it localizes specifically to sites of active DNA replication on nascent chromatin. Biochemical and cellular analysis confirms that ATAD2 is recruited to these replication sites through direct interaction with this H4K5/K12 di-acetylation mark, and expressing ATAD2 mutants deficient in binding to these acetylated residues reduces DNA replication efficiency and impairs loading of PCNA onto chromatin, comparable to the effect of depleting ATAD2 entirely, directly establishing that ATAD2's bromodomain-mediated recognition of newly deposited, acetylated histones is functionally required to support ongoing DNA replication rather than merely correlating with it. Structural analysis of the ATAD2 bromodomain bound to acetylated histone H4 peptides shows that a conserved tyrosine residue within the bromodomain forms key contacts with the bound acetyllysine, and mutating this residue slows the exchange dynamics of ATAD2 on chromatin as measured by fluorescence recovery after photobleaching, further confirming that histone acetylation recognition governs ATAD2's chromatin association in living cells; separately, histone acetylation-guided recruitment of ATAD2 increases overall chromatin accessibility and histone exchange dynamics in embryonic stem cells, where ATAD2 becomes specifically required to sustain gene expression programs during differentiation despite being largely dispensable for proliferation of exponentially growing cells. Because ATAD2 is frequently overexpressed across many cancer types and has been proposed to function as an oncogenic transcriptional cofactor in addition to its replication-coupled chromatin reader role, its bromodomain has become a target of interest for small-molecule inhibitor development aimed at disrupting this histone acetylation-dependent chromatin engagement. |
Usage Information
| Application | WB, IP, IHC, IF | Dilution |
|
||||||||
|---|---|---|---|---|---|---|---|---|---|---|---|
| Reactivity | Human, Mouse, Rat, Monkey | ||||||||||
| Source | Rabbit Monoclonal Antibody | MW | 159 kDa | ||||||||
| Storage Buffer | PBS, pH 7.2+50% Glycerol+0.05% BSA+0.01% NaN3 | Storage (from the date of receipt) |
-20°C (avoid freeze-thaw cycles), 2 years | ||||||||
| IP |
Experimental Procedure:
Reagents and Preparation
1. Basic buffers: 1× PBS or 1× TBS (pre-chilled on ice); 1× cell lysis buffer (add 1 mM PMSF protease inhibitor immediately before use; add phosphatase inhibitors for phosphoproteins).
2. Capture medium: Protein A/G magnetic beads or agarose beads (Sepharose beads).
3. Controls: Use an isotype control IgG matching the host species and IgG subclass of the primary antibody, at the same concentration. It is recommended to reserve a portion of the cell lysate that has not been subjected to immunoprecipitation as the Input control; if necessary, a beads-only control (beads added without antibody) may also be included.
4. Loading and elution reagents: 3× or 4× SDS sample loading buffer (containing DTT/reducing agent); if non-denaturing elution is to be performed, prepare the corresponding elution buffer and neutralization buffer separately; for denaturing elution, 1× PBS is typically used to dilute the 3× or 4× SDS sample loading buffer to 1×.
Cell Lysis and Sample Preparation (Native Protein Extraction)
1. Cell harvesting: Discard the culture medium and wash the cells once with ice-cold 1× PBS.
2. Cell lysis: Add 0.5–1 mL of ice-cold 1× cell lysis buffer to a 10-cm culture dish and incubate on ice for 5–10 minutes.
3. Lysate collection and clarification: Scrape the cells and transfer the lysate to a microcentrifuge tube. Some adherent cells may require detachment using digestive enzymes or mechanical methods. Centrifuge at 14,000 rpm at 4°C for 5–15 min. Collect the supernatant as the clarified cell lysate. It is recommended to determine the protein concentration.
Pre-clearing and Immunoprecipitation Reaction
1. Pre-clearing of the lysate (recommended): Take an appropriate amount of beads (magnetic beads or agarose beads) and pre-wash 2–3 times with cell lysis buffer or 1× TBS/PBS. After pre-washing, it is recommended to remove the wash buffer as completely as possible before adding subsequent reagents, to avoid extra dilution of the sample. For lysis systems containing detergents or specific salt concentrations, prefer pre-washing with a buffer identical or compatible with the lysis buffer to minimize buffer-system mismatches.
2. Pre-clearing treatment: Mix the cell lysate with the pre-washed beads and incubate with rotation at room temperature for 30–60 min, or at 4°C with rotation for 1–2 h.
When using agarose beads, pellet the beads by centrifugation after incubation and collect the supernatant.
When using magnetic beads, separate the beads using a magnetic stand after incubation and collect the supernatant.
This step removes proteins that bind non-specifically to the beads. For unstable proteins, phosphoproteins, or protein complexes, incubation at 4°C is preferred to minimize protein degradation, dephosphorylation, or complex dissociation. Beads used for pre-clearing should generally not be pre-coupled with a specific antibody, to avoid loss of the target antigen.
3. Formation of the “bead–antibody–antigen” immunocomplex
Either of the following two approaches may be used:
3.1 Pre-form the antibody–antigen complex, then add the beads: Add an appropriate amount of primary antibody to the pre-cleared supernatant obtained in step 2, and set up an isotype control IgG group in parallel. Incubate with rotation at 4°C overnight (recommended), or at room temperature with rotation for 2 h, to allow formation of the antibody–antigen complex.
In parallel, take an appropriate amount of beads and pre-wash them as described in step 1 of this section. Add the antibody–antigen complex to the pre-washed magnetic or agarose beads and incubate with rotation at room temperature for 30 min–1 h, or at 4°C with rotation for 1–2 h, to allow the antibody–antigen complex to bind efficiently to the beads.
3.2 Pre-form the bead–antibody complex, then add the cell lysate: Dilute the primary antibody in cell lysis buffer at the dilution ratio recommended in the antibody instruction manual to prepare the antibody working solution. Add an appropriate amount of pre-washed magnetic beads to the antibody working solution and incubate with rotation at room temperature for 15 min, or at 4°C with rotation for 1 h, to form the bead–antibody complex.
Recover the beads by magnetic separation or centrifugation, discard the supernatant, and pre-wash the beads 2–3 times with 1× TBS. Then add the cell lysate and incubate with rotation at 4°C overnight (recommended), or at room temperature with rotation for 2 h.
Washing of the Precipitate and Sample Elution
1. Once immunoprecipitation is complete, separate the beads according to their type and discard the supernatant.
Magnetic beads are separated using a magnetic stand.
For agarose beads, low-speed centrifugation (500–1000 rpm) appropriate for the bead specifications should be used, to avoid bead compaction or damage caused by high-speed centrifugation.
2. Washing the beads: Gently wash the beads 3–5 times with ice-cold 1× cell lysis buffer or 1× TBS/TBST. Keep the temperature low throughout the washes. After each addition of wash buffer, mix gently to fully resuspend the beads; then separate the beads using a magnetic stand or appropriate centrifugation, depending on the bead type, and remove the wash buffer thoroughly to minimize unbound and non-specifically bound components. During each wash, remove as much supernatant as possible while avoiding aspiration of the beads. After the final wash, remove residual wash buffer as completely as possible to prevent dilution of the eluate or interference with downstream analyses. Keep the samples on ice after each wash.
3. Sample elution (choose one of the following):
3.1 Denaturing direct elution (most commonly used): Add SDS sample loading buffer to the bead pellet to a final concentration of 1×. If 3× or 4× SDS sample loading buffer is used, it must first be diluted to 1×. Mix well and heat at 95–100°C for 5 minutes. Separate the beads and collect the supernatant for subsequent electrophoresis.
3.2 Chemical / non-denaturing elution (preserves protein activity): After the final wash, separate the beads using a magnetic stand or low-speed centrifugation, depending on the bead type, and remove residual wash buffer as completely as possible to prevent dilution of the eluate. Add an appropriate amount of acidic elution buffer / high-salt elution buffer to the beads and resuspend them thoroughly. Mix gently and incubate briefly at room temperature to allow the immunocomplex to dissociate from the beads. Separate the beads with a magnetic stand or low-speed centrifugation, and transfer the eluate to a collection tube pre-filled with an appropriate amount of neutralization buffer; adjust the pH if necessary. To improve recovery, elution may be repeated and the eluates pooled. The composition and volume of the elution buffer and neutralization buffer should be determined according to the instructions for the beads and kit used.
3.3 Post-elution sample handling
For protein activity assays, native protein complex analysis, or other non-denaturing analyses: do not add SDS sample loading buffer; keep the sample on ice and proceed to the subsequent experiment as quickly as possible.
For SDS-PAGE or Western blot: add SDS sample loading buffer to the neutralized or desalted eluate to a final concentration of 1×, and then process the sample according to the subsequent electrophoresis requirements.
Select appropriate storage conditions according to the stability of the target protein and the requirements of downstream experiments, and avoid repeated freeze–thaw cycles.
Downstream Analysis
Western blot analysis: Take the supernatant and perform SDS-PAGE electrophoresis followed by membrane transfer. It is recommended to use light- and heavy-chain-specific or conformation-specific secondary antibodies to avoid interference of the immunoglobulin heavy/light chain bands (50 kDa / 25 kDa) with detection of the target protein. It is recommended to include Input, isotype control IgG-IP, and target antibody-IP samples on the same Western blot; if necessary, a beads-only control may also be added to evaluate immunoprecipitation efficiency and non-specific binding. Kinase activity assay (if applicable): skip the denaturation step, wash the beads with kinase buffer, then add substrate and ATP directly to perform the kinase reaction.
Note: All lysis and immunoprecipitation procedures should be performed at 4°C or on ice to preserve the native conformation of proteins as much as possible and prevent their degradation. |
References
|
Application Data
WB
Validated by Selleck
-
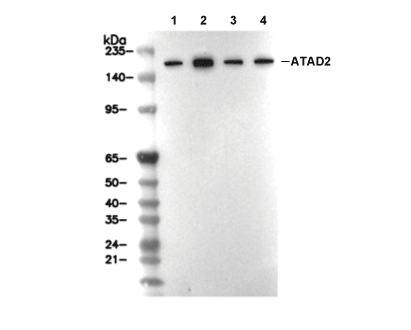 Lane 1: MCF7, Lane 2: Neuro-2a, Lane 3: C6, Lane 4: COS-7